herdr Tutorial: Run Multiple AI Agents in One Terminal
Install herdr with brew or mise, give each AI its own worktree and pane, spot the blocked one in the sidebar, then detach and come back.
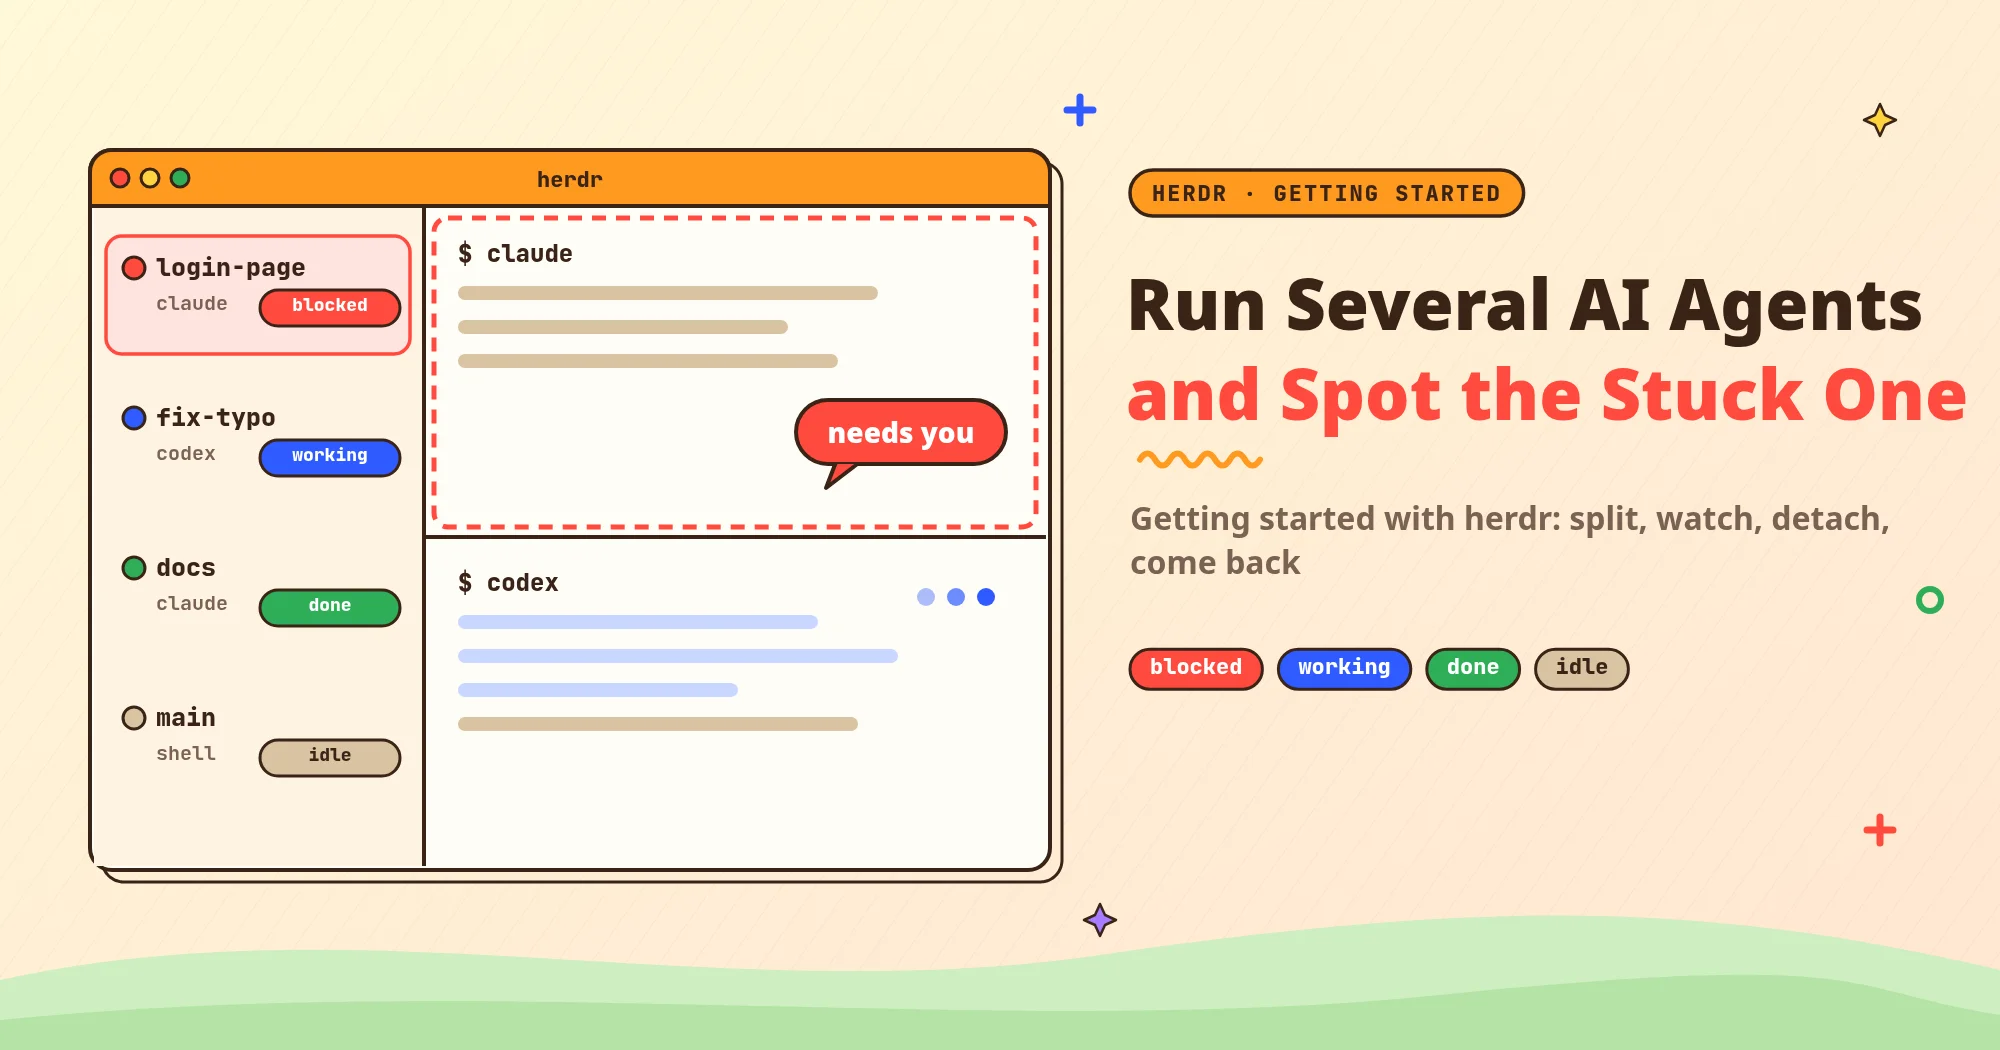
If you followed git worktree for AI Agents: Run Two Agents in One Repo and now run two or three coding agents at once, the next snag is usually telling which one waits for you to click Allow and which one is still working. You have to flip through the windows one by one. And if you close the terminal or your SSH connection drops, half-finished work may stop with it.
herdr is a tool that manages workspaces and split views in your terminal; the official docs also call it a terminal workspace manager. It puts each agent in its own split view (a pane) and recognizes which coding agent runs there. A colored dot in the sidebar then shows whether the agent is working, waiting for you, or done.
Close the view you are looking at, and the work in the background keeps going. The official description is “the runtime your coding agents live on.”
herdr does not wrap or replace your agents. The README says “herdr doesn’t wrap or replace them; it owns their terminals.” It manages the terminals, and the agent is still the one you already use.
This post covers the terminal Herdr TUI (herdr.dev/tui). The Herdr desktop App (herdr-app) that the herdr.dev homepage now promotes is a separate program, and an agent started in one does not show up in the other. For the desktop app, see Herdr Desktop App: Manage AI Agents With Spaces and Tabs.
The post focuses on macOS and Linux and uses Claude Code and Codex as examples; for the other supported agents, see Agents. Native Windows support is available, with known limitations; see Windows support.
Based on the official docs for herdr v0.9.5, released on 2026-10-15; on 2026-11-12 I confirmed it was still the latest stable release. herdr is still 0.x and changes quickly, so treat the commands and shortcuts in the official docs as authoritative.
A few terms first
- Terminal: The text window where you type commands.
- Detach / reattach: Leave the view for a while, then come back to the same session.
- Prefix key: Press
ctrl+b, release it, then press the next key. The official Keyboard example is “prefix+cmeans: pressctrl+b, release, then pressc.” Soprefix+shift+gmeans releasectrl+b, then pressshift+g. On a Mac this is the Control key, not Command; if you have used tmux, it will feel familiar. - Package manager: A program such as Homebrew (
brew) or mise that installs, upgrades, and removes tools for you. - Coding agent, worktree, and branch: Same sense as in the worktree post: an agent edits files and runs commands on its own. A worktree is a separate working directory in the same repo. A branch is a separate line of changes in git, and each working directory sits on its own branch.
herdr itself has these layers:
flowchart LR
  C["View (client)"] -->|attaches to| S[Background server]
  S --> W[workspace]
  W --> T[tab]
  T --> P1["pane: Claude Code"]
  T --> P2["pane: Codex"]
- Background server / client: herdr runs terminals in a background server, and the view you see is only a client attached to it.
- Workspace: One project or task. The official guidance is “one workspace per repo, task, or investigation.”
- Tab: A layout inside a workspace.
- Pane: A real terminal split. The official wording is “A pane is a real terminal.”
For commands, shortcuts, state definitions, and what happens when you disconnect, I follow the official docs and link to them. “Install with brew or mise,” “one workspace per worktree,” and “deal with blocked first” are my own suggestions, and I mark them as such.
When it is worth using
I suggest herdr if you run two or more agents at once, or you often step away or work on a remote machine over SSH. If you only run one agent, or you already have a setup that works, I do not think you need to switch.
Before you start
- A Mac or Linux computer and a terminal. On macOS, the built-in Terminal app is fine.
- Either Homebrew or mise. If you have used neither, on macOS you can install Homebrew first by following the instructions on the Homebrew website.
- A project folder managed with git that has at least one commit. You will need it in Step 3 to create a worktree.
- Claude Code or Codex already installed and signed in: typing
claudeorcodexin a regular terminal should start it.
Once herdr is installed, each round of work is the five steps in the figure below, which match Steps 2 through 6.
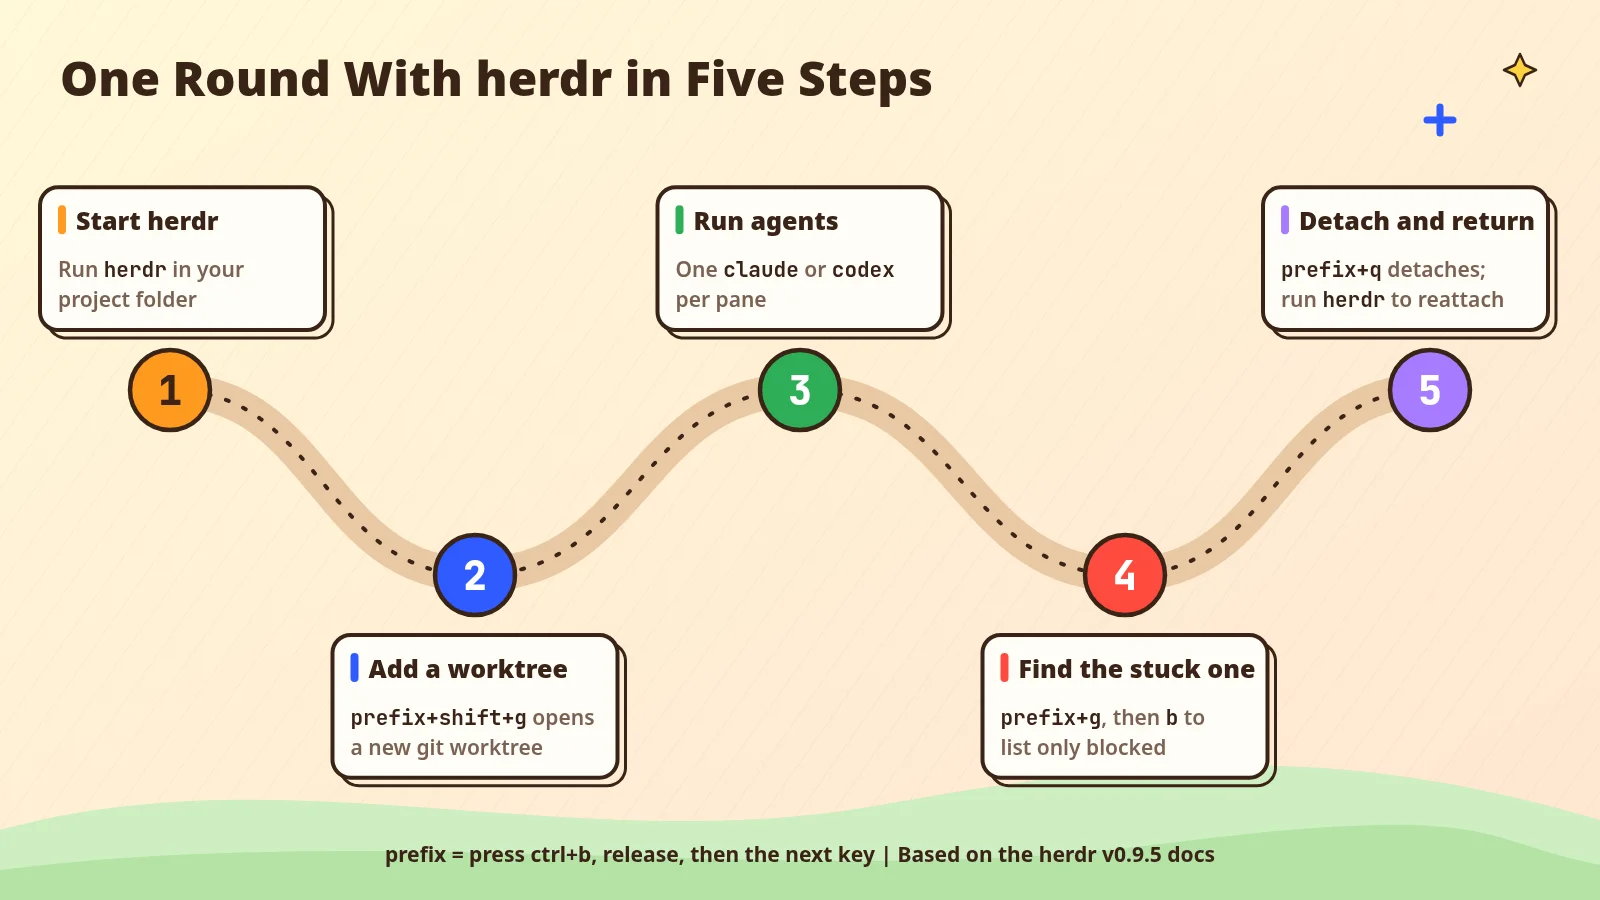 Concept diagram: The five steps in one loop are Start herdr, Add a worktree, Run agents, Find the stuck one, and Detach and return. The prefix means press ctrl+b, release, then press the next key.
Step 1: Install herdr
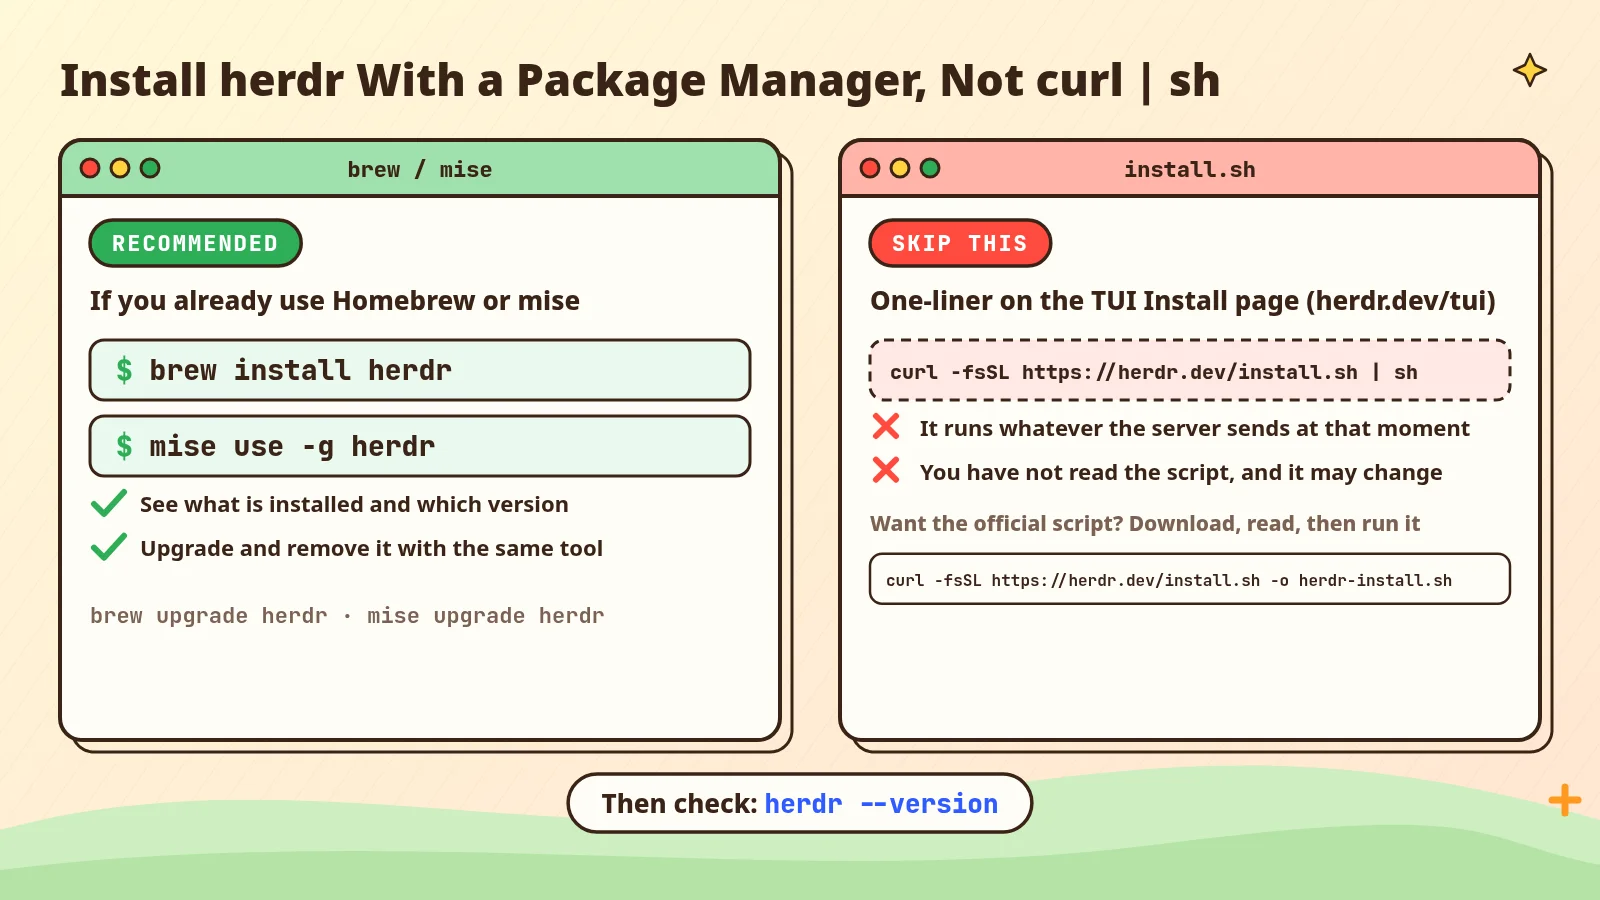 Concept diagram: The left side is this site’s suggestion, installing and upgrading with brew or mise. The right side is the one-liner from the official Install/TUI page; if you use it, download the script, read it, then run it.
If you already use Homebrew, I recommend installing with brew:
1
brew install herdr
If you already use mise, I recommend installing with mise:
1
mise use -g herdr
Both are listed on the official Install page. If mise reports herdr not found in mise tool registry, the official docs say to update mise and try again. If you installed mise with brew, run:
1
brew upgrade mise
Otherwise, run:
1
mise self-update
The official one-liner: download and read it first
The official Install/TUI page also offers a one-line install command, curl -fsSL https://herdr.dev/install.sh | sh. I recommend not pasting it straight into a shell, for two reasons:
- What runs is whatever the server returns at that moment, which you have not read, and a later run may not be the same.
- It installs into
~/.local/binand then updates itself withherdr update, so it never appears in your package manager’s list. That makes it harder to see what you installed, and harder to remove it later. With brew or mise, you can look up the version, and upgrades and uninstalls use the same tool.
That is not a claim that the install script is broken. It comes from my habit of reading first, then running, which I explained in Third-Party Skills and MCP Servers: The New Attack Surface in Your Coding Agent.
If you do need the official script, download it to a file first:
1
curl -fsSL https://herdr.dev/install.sh -o herdr-install.sh
Open it in a text editor and read it. You can also read it with less in the terminal, and press q when you are done:
1
less herdr-install.sh
Once you are satisfied, run:
1
sh herdr-install.sh
If you cannot tell what the script does, I suggest using brew or mise instead.
Check the install
After the install, run:
1
herdr --version
According to the official docs, it prints a version number, such as 0.9.5. If you use a Chinese, Japanese, or Korean input method and the prefix shortcuts do not respond, make sure you are on 0.9.5 or later. The official notes for this release include a fix for that.
Upgrade with the tool you installed with
The official wording is: “Use herdr update only for installs managed by Herdr’s own installer. Update Homebrew, mise, and Nix installs through those package managers instead.” If you installed with brew, run:
1
brew upgrade herdr
If you installed with mise, run:
1
mise upgrade herdr
After a package-manager upgrade, run herdr again to reconnect with the new client. The background server and the agents already running are not affected.
To move the server itself to the new version, stop the server and start it again, as the Update section of the Install page describes. Stopping the server stops every running agent (see Step 6). Run these in order:
1
2
herdr server stop
herdr
If you do not want herdr contacting herdr.dev in the background, turn off these two checks under [update] in the config file; see Configuration. The config file is ~/.config/herdr/config.toml; create it if it does not exist:
1
2
3
[update]
version_check = false
manifest_check = false
Step 2: Start herdr in your project folder
In the terminal, move into your project folder, then run herdr. For example:
1
2
cd ~/projects/demo-app
herdr
According to the Quick start, this launches or attaches to your default background session. If that session has no workspaces yet, herdr opens one automatically; that is the demo-app entry in the sidebar below. Each worktree you add later gets one more workspace (Step 3).
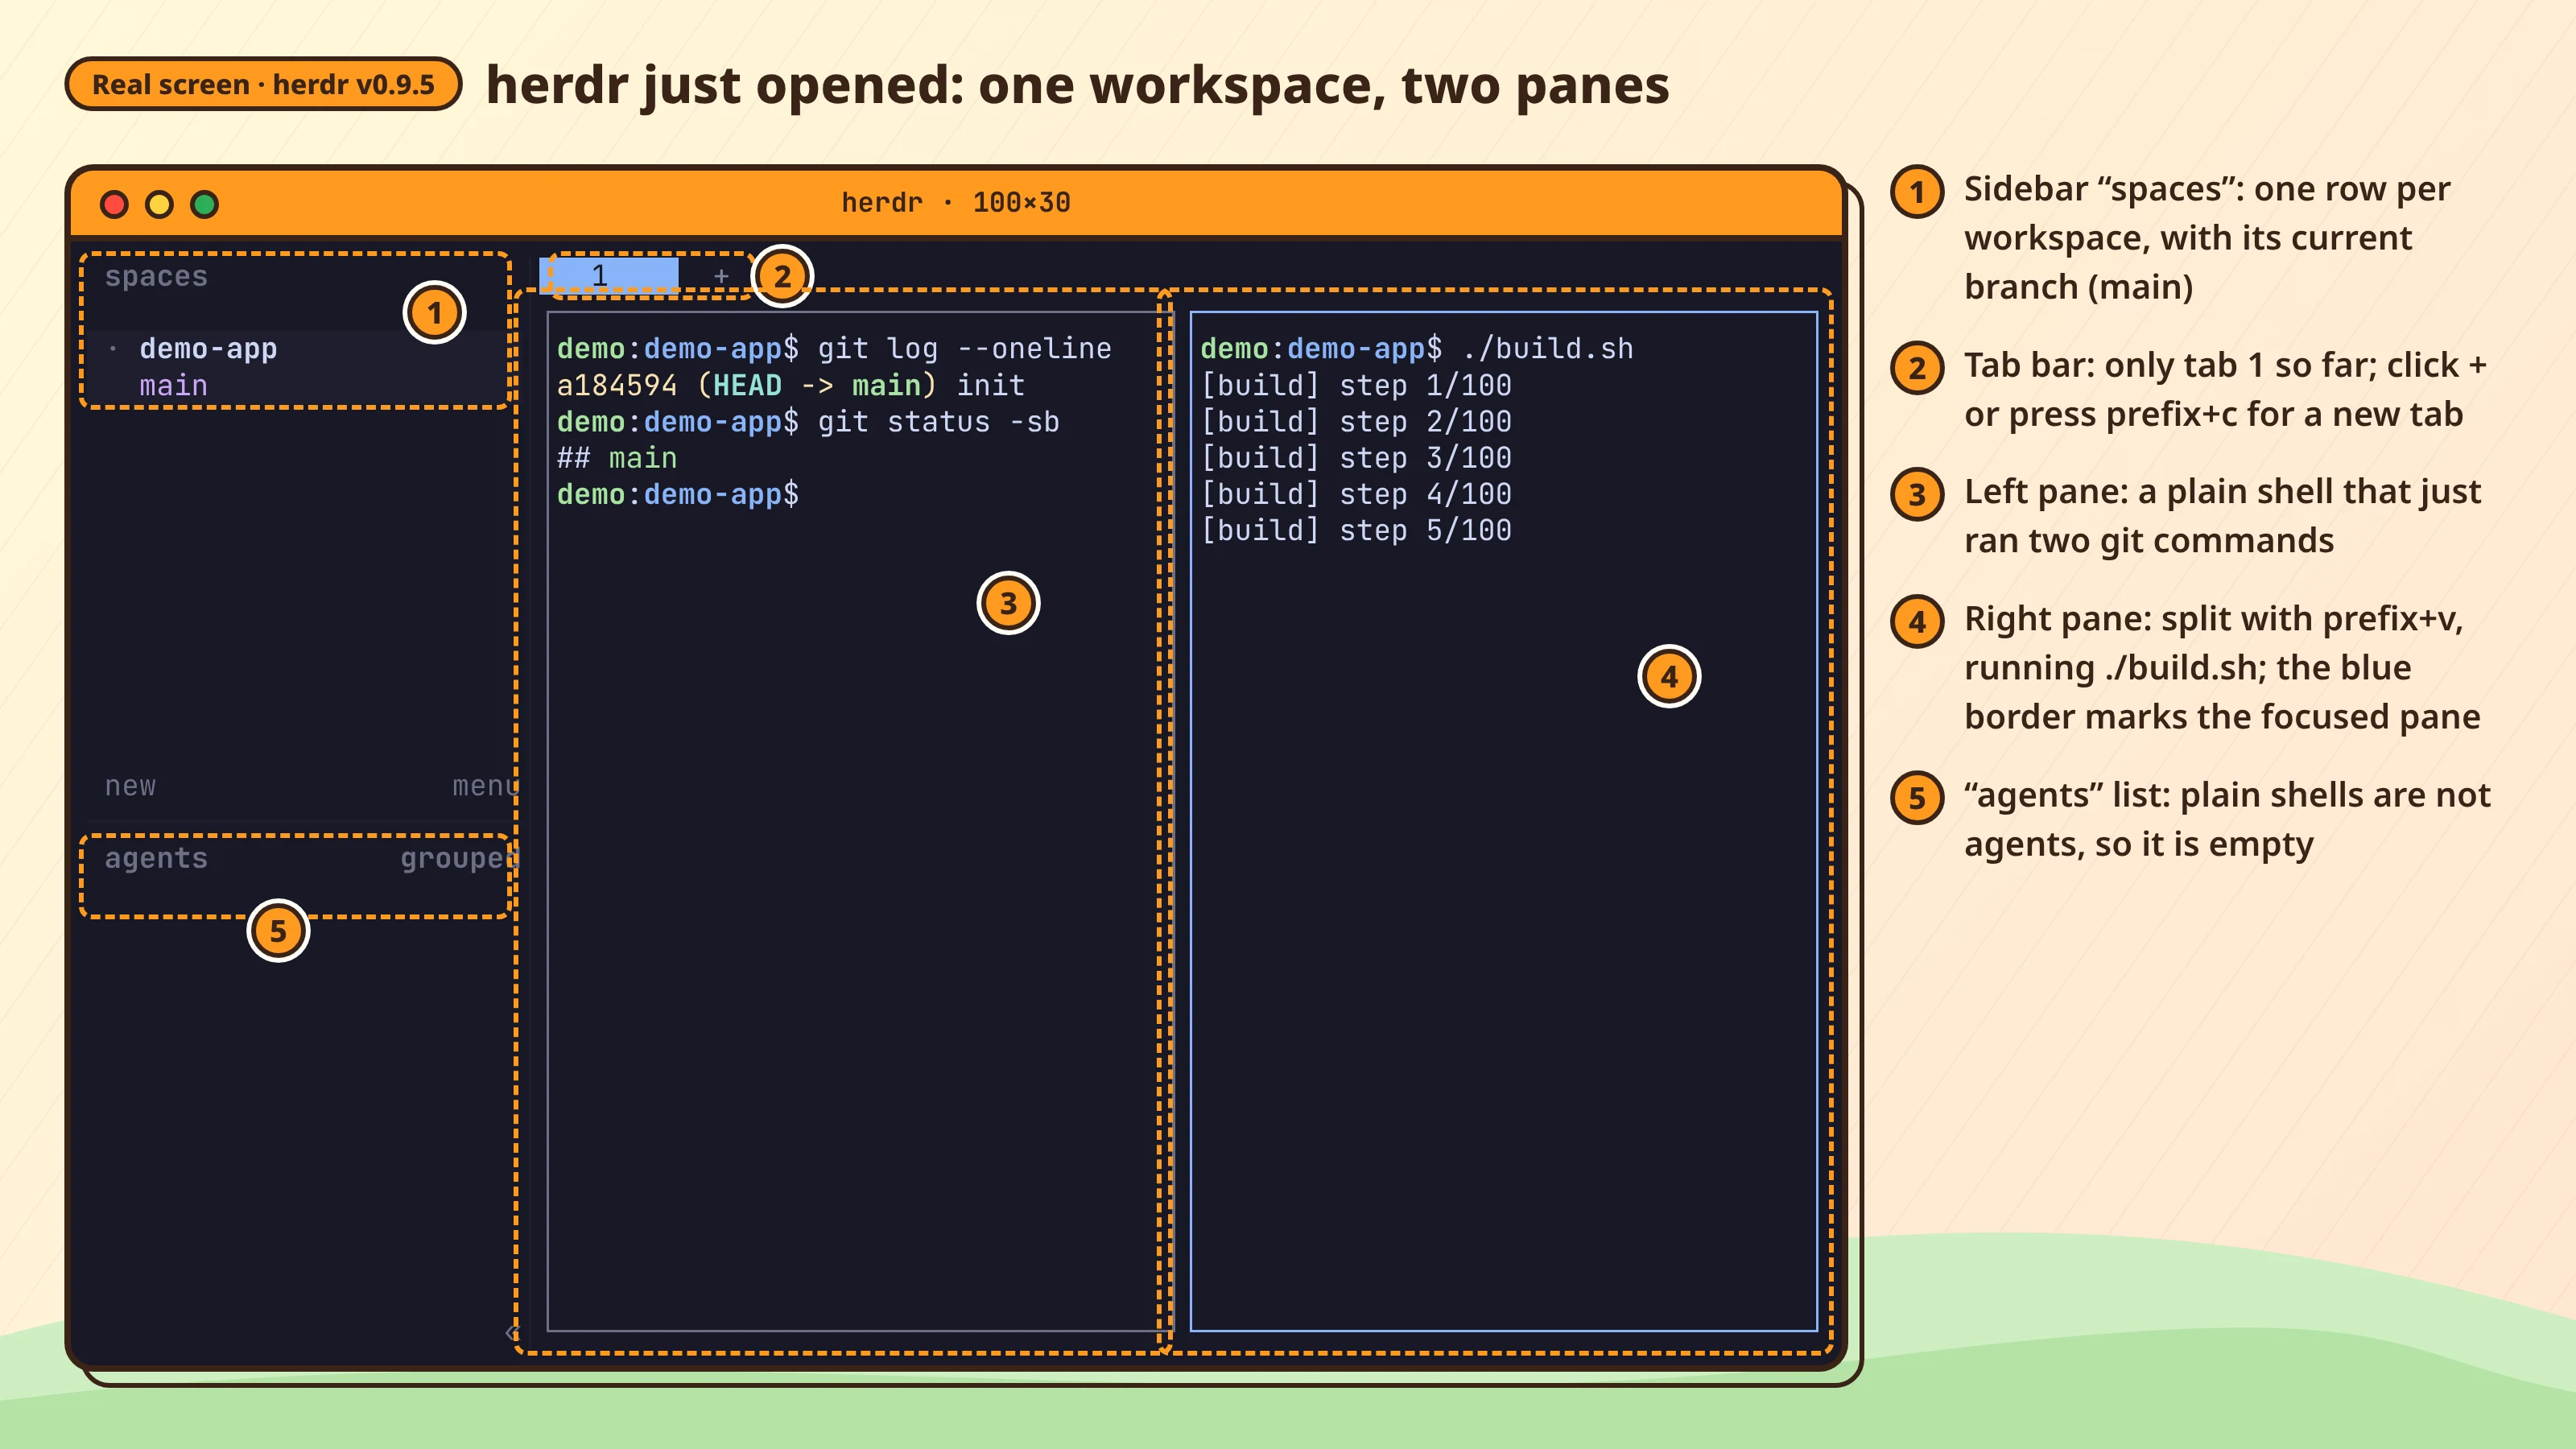 Real screen: herdr opened in the demo-app folder, with a second pane split off by prefix+v. Both panes run a plain shell, not an agent, so the agents list is empty.
You can use herdr entirely with the mouse: click to switch between panes, tabs, workspaces, and agents, drag borders to resize, and right-click to split. The official docs say the mouse covers everything and keyboard shortcuts are optional, so do not worry if you cannot remember the shortcuts below.
Step 3: Give each working directory its own workspace
I suggest one workspace per worktree, so each agent edits only its own working directory and two agents never change the same file at the same time. This follows the same idea as the worktree post.
For how to merge and delete branches when you are done, and why repos with submodules should not use worktrees, see git worktree for AI Agents: Run Two Agents in One Repo.
There are two ways to create one; pick either. Both use git worktree underneath. When you clean up, keep in mind that closing a workspace and deleting a worktree are different things:
flowchart LR
  A["Option A: prefix+shift+g"] --> W[Worktree workspace]
  B["Option B: git worktree add"] --> N["prefix+shift+n, then cd"]
  N --> W
  W -->|"Close: prefix+shift+d"| K[Folder and branch stay]
  W -->|"Delete worktree checkout... or git worktree remove"| F["Folder gone, branch stays"]
Option A: Let herdr create it.
- In the project’s workspace, press
prefix+shift+g, or pickNew worktreefrom the workspace’s row in the sidebar. A new worktree dialog opens. - The branch field starts with a random name. Press ctrl+c to clear it, then type the branch name you want, for example
login-page. - Press Enter. herdr creates a git worktree and opens it as a new workspace, grouped under the original project. Click its name in the sidebar to switch to it.
This does the same thing as running the following inside the project folder:
1
herdr worktree create --branch login-page
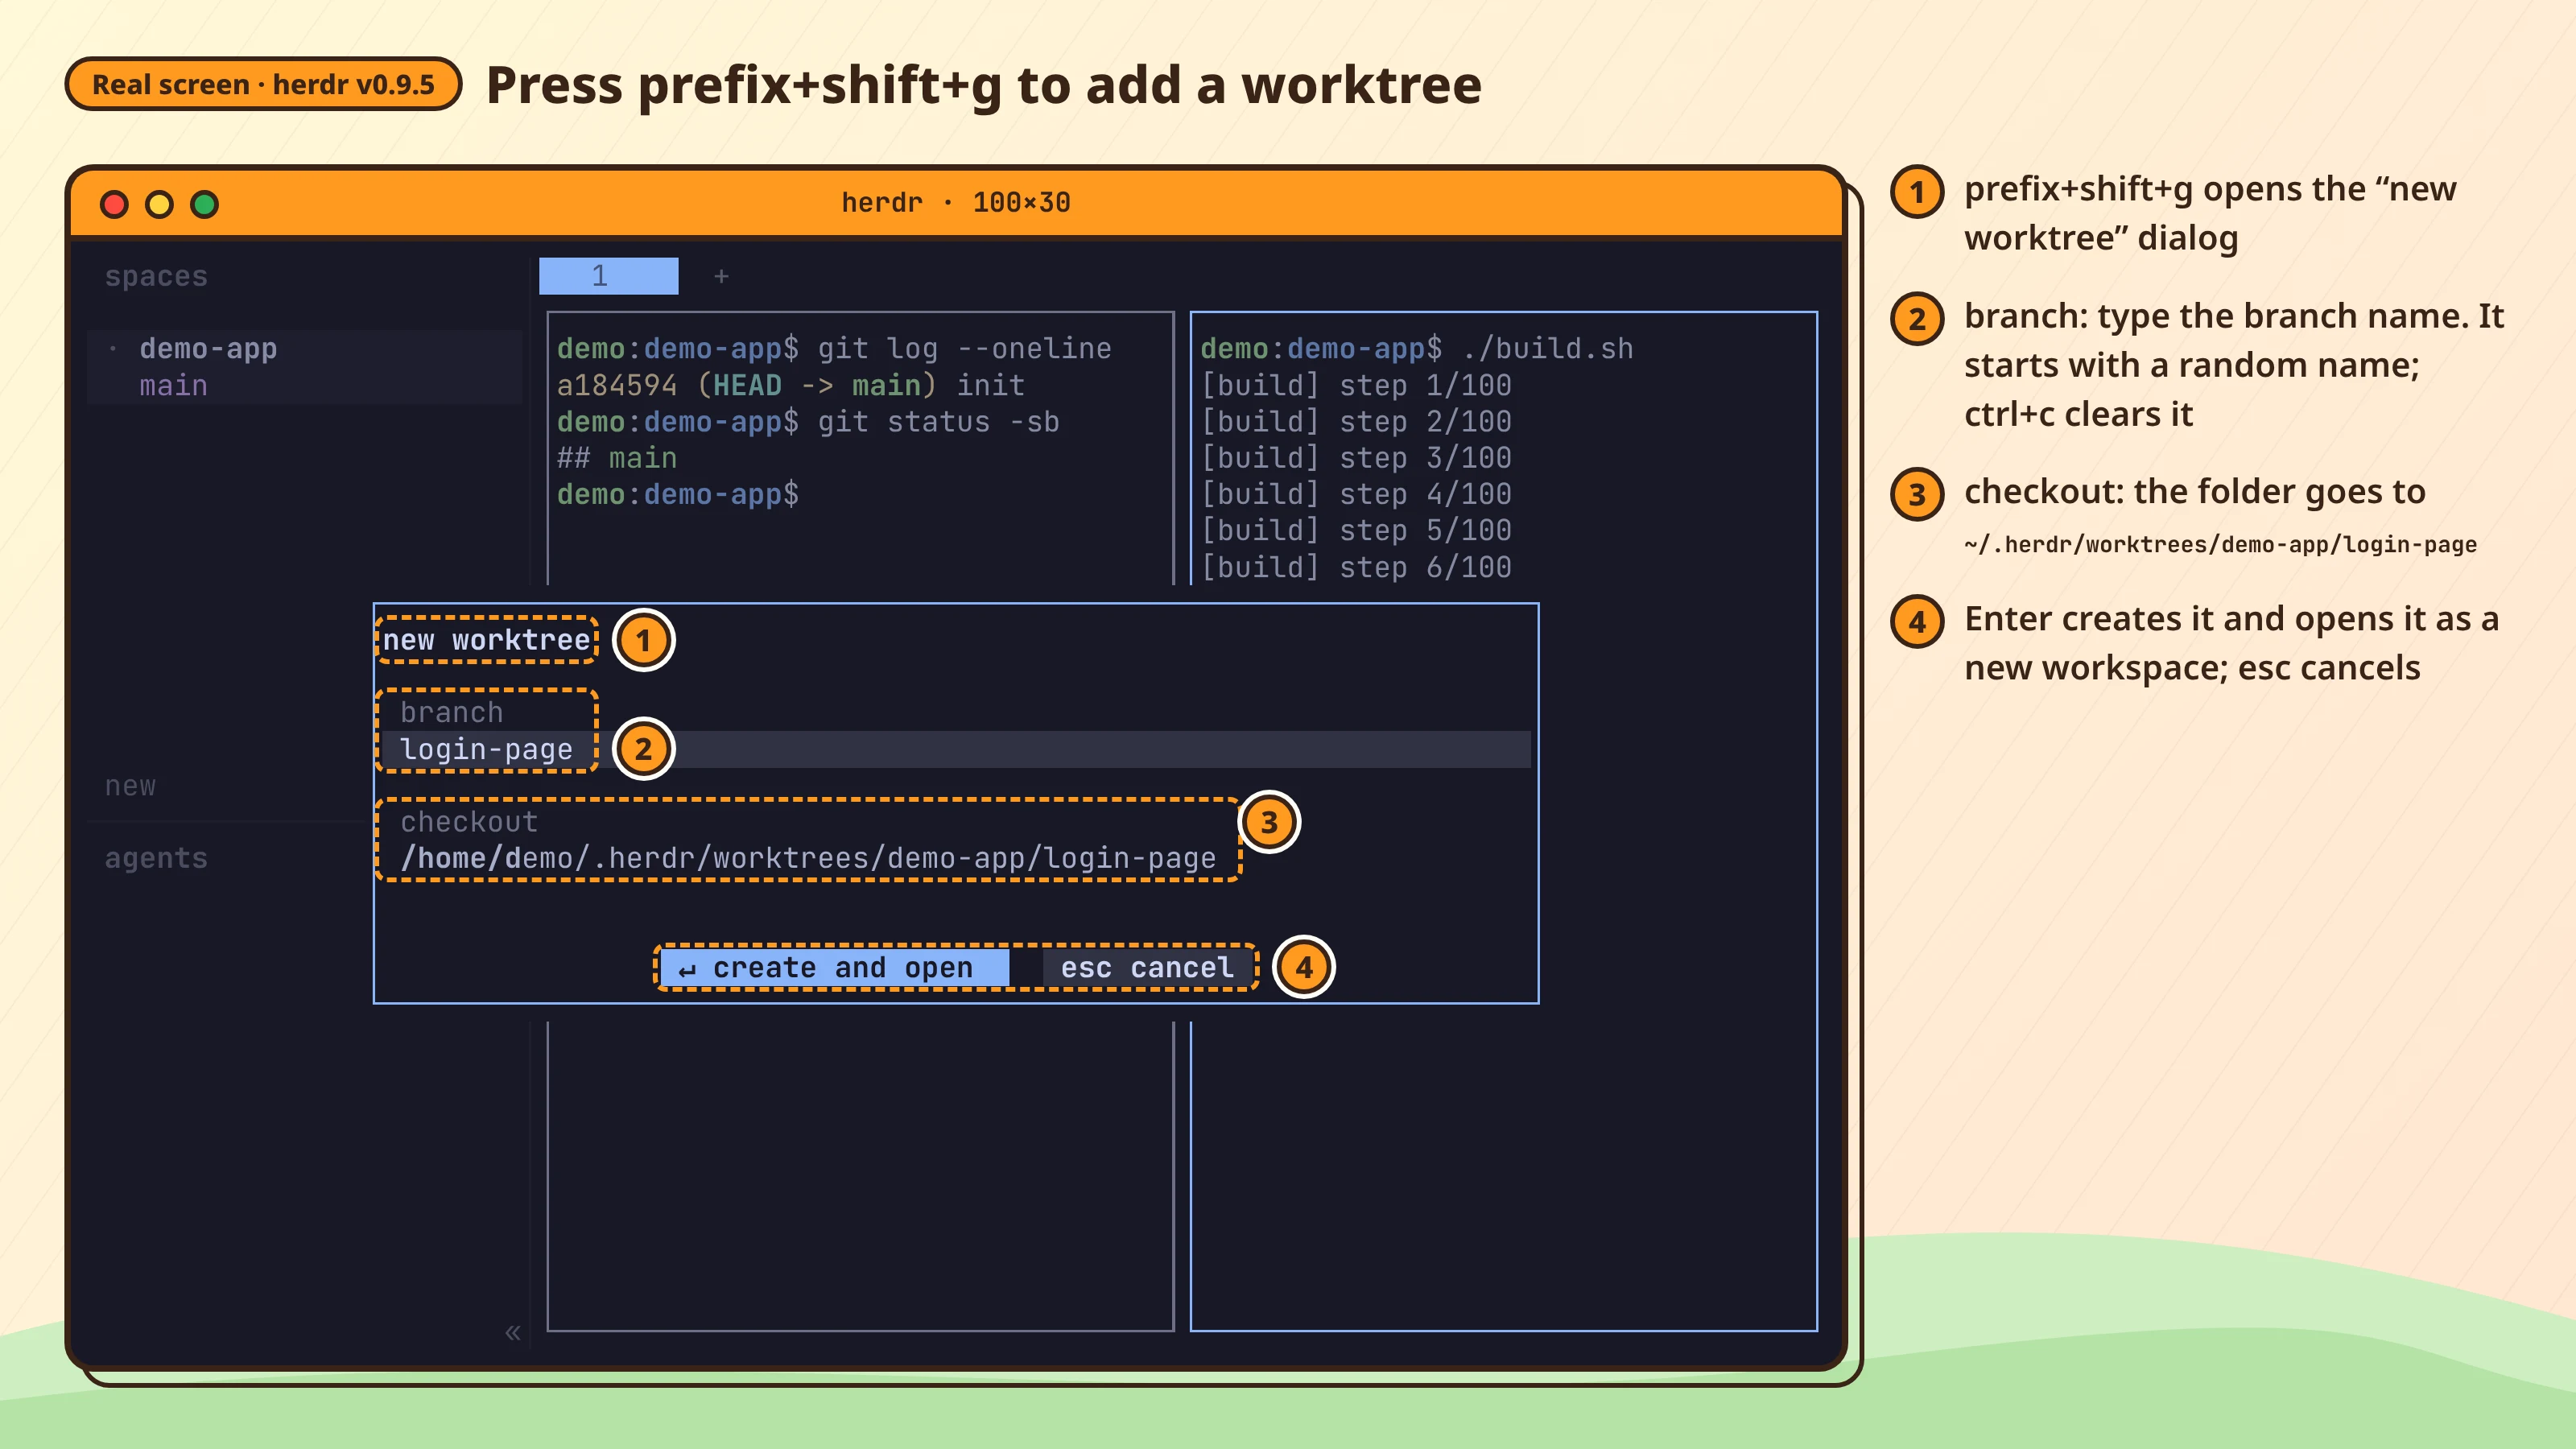 Real screen: prefix+shift+g adds a worktree. The branch field starts with a random name, so press ctrl+c to clear it before typing; Enter creates it and opens a new workspace.
The default location is ~/.herdr/worktrees/<repo>/<branch>. To change it, set [worktrees] directory in ~/.config/herdr/config.toml; see Configuration.
Option B: Follow the worktree post. Inside the project folder, create the worktree folder with git first, for example:
1
git worktree add -b login-page ../demo-app-login-page
Then press prefix+shift+n in herdr to open a new workspace, and move into the folder you just created:
1
cd ../demo-app-login-page
According to the official docs, closing the project’s row also closes the worktree workspaces grouped under it.
To remove a worktree folder, select that worktree’s workspace in the sidebar (the row grouped under the project) and use Delete worktree checkout.... It runs git worktree remove underneath, and you can also run that yourself. Either way, delete the branch separately.
Step 4: Start an agent in each pane
Switch to the workspace you want, and type claude or codex in a pane, just as you would in a regular terminal. According to the Quick start, herdr detects which agent it is automatically, and a new row appears in the agents section of the sidebar.
Official support also includes Cursor Agent CLI, GitHub Copilot CLI, OpenCode, and others; see the full list on Agents. If you need another terminal in the same workspace, for example to run tests, split a pane: prefix+v to the right, prefix+minus downward.
Integrations are optional. You can read states without them; install one if you want the same conversation to resume after herdr’s background server restarts. For Claude Code, run:
1
herdr integration install claude
For Codex, run:
1
herdr integration install codex
An integration changes the agent’s settings; see Integrations:
- Claude Code: it adds a hook script and the matching hook entries in
settings.json. - Codex: it adds a hook script, updates
hooks.json, and turns on[features] hooks = trueinconfig.toml.
To remove one, run the line below; for Codex, replace claude with codex. After removal, Codex’s config.toml is not reverted.
1
herdr integration uninstall claude
For what a hook is, see my post Claude Code Hooks: Format, Test, and Flag Sensitive Files.
Step 5: Read the states and find the stuck one
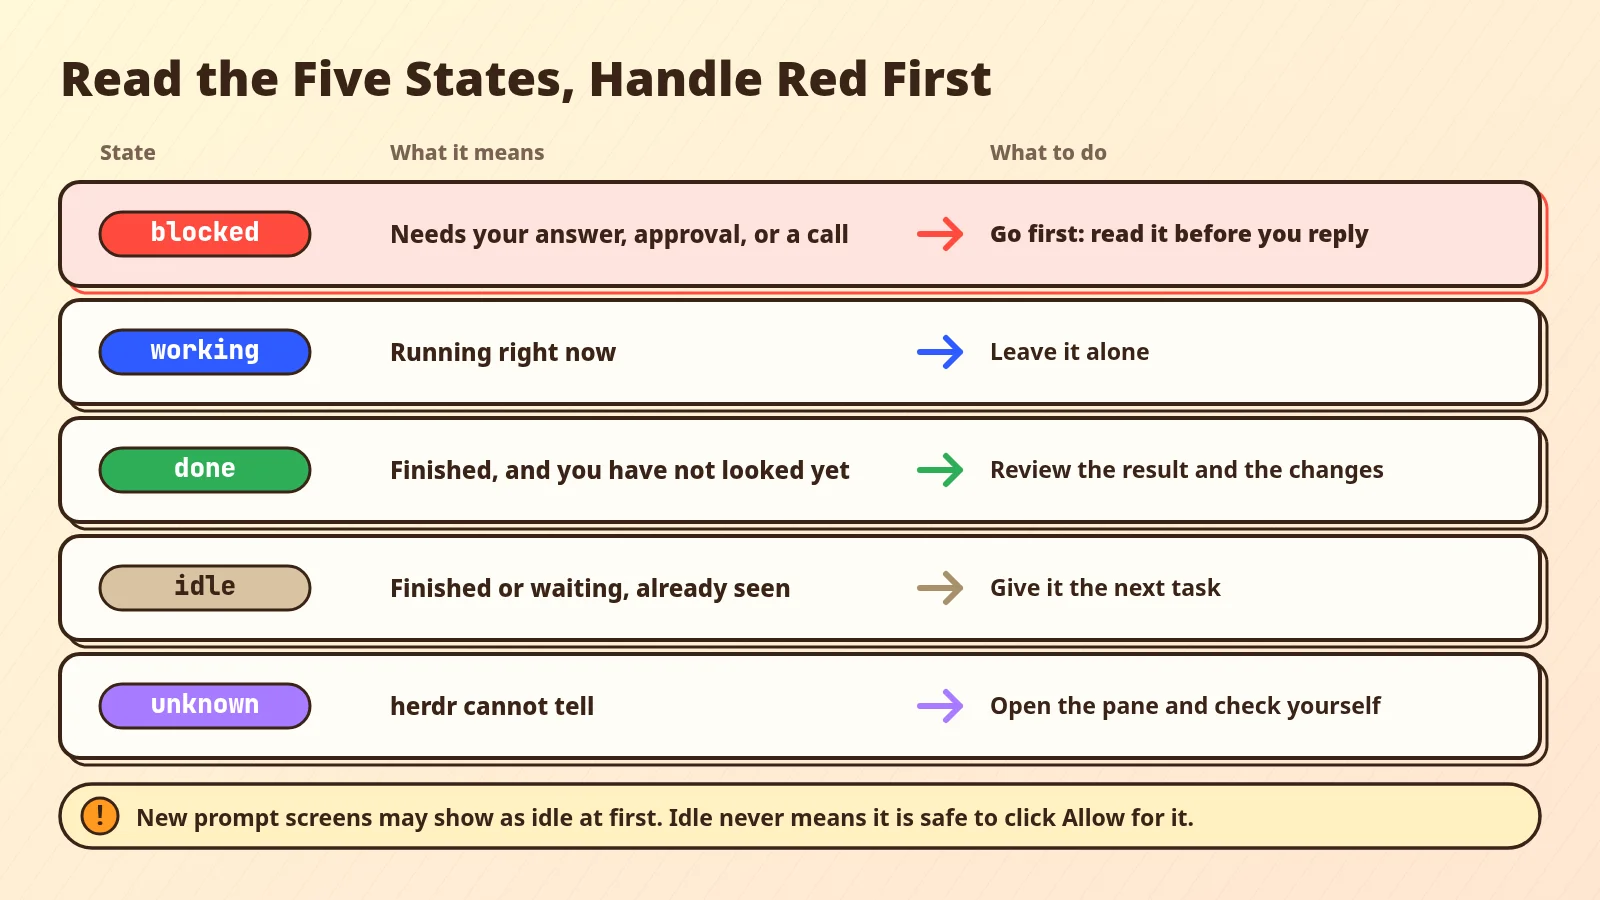 Concept diagram: What the five states mean, and what this site suggests you do. Deal with blocked first. A new prompt may first show as idle, and idle does not mean you can click Allow without reading. The colors in the figure are this site’s palette, not herdr’s own UI colors.
The sidebar marks each agent’s state with a colored dot. If an agent in a workspace is blocked, that workspace’s own row also uses the blocked color. The official docs define five states; the right-hand column, “what you should do,” is my suggestion.
| State | Official meaning, in plain words | What this site suggests you do |
|---|---|---|
| blocked | It is waiting for an answer, an approval, or a decision | Deal with it first: open it, read carefully, then answer |
| working | It is running | Leave it alone and let it work |
| done | It finished, and you have not looked yet | Go read the result and check what changed |
| idle | It finished or is waiting for the next instruction, and you have already looked | You can give it the next task |
| unknown | herdr cannot tell the state | Open it yourself and take a look |
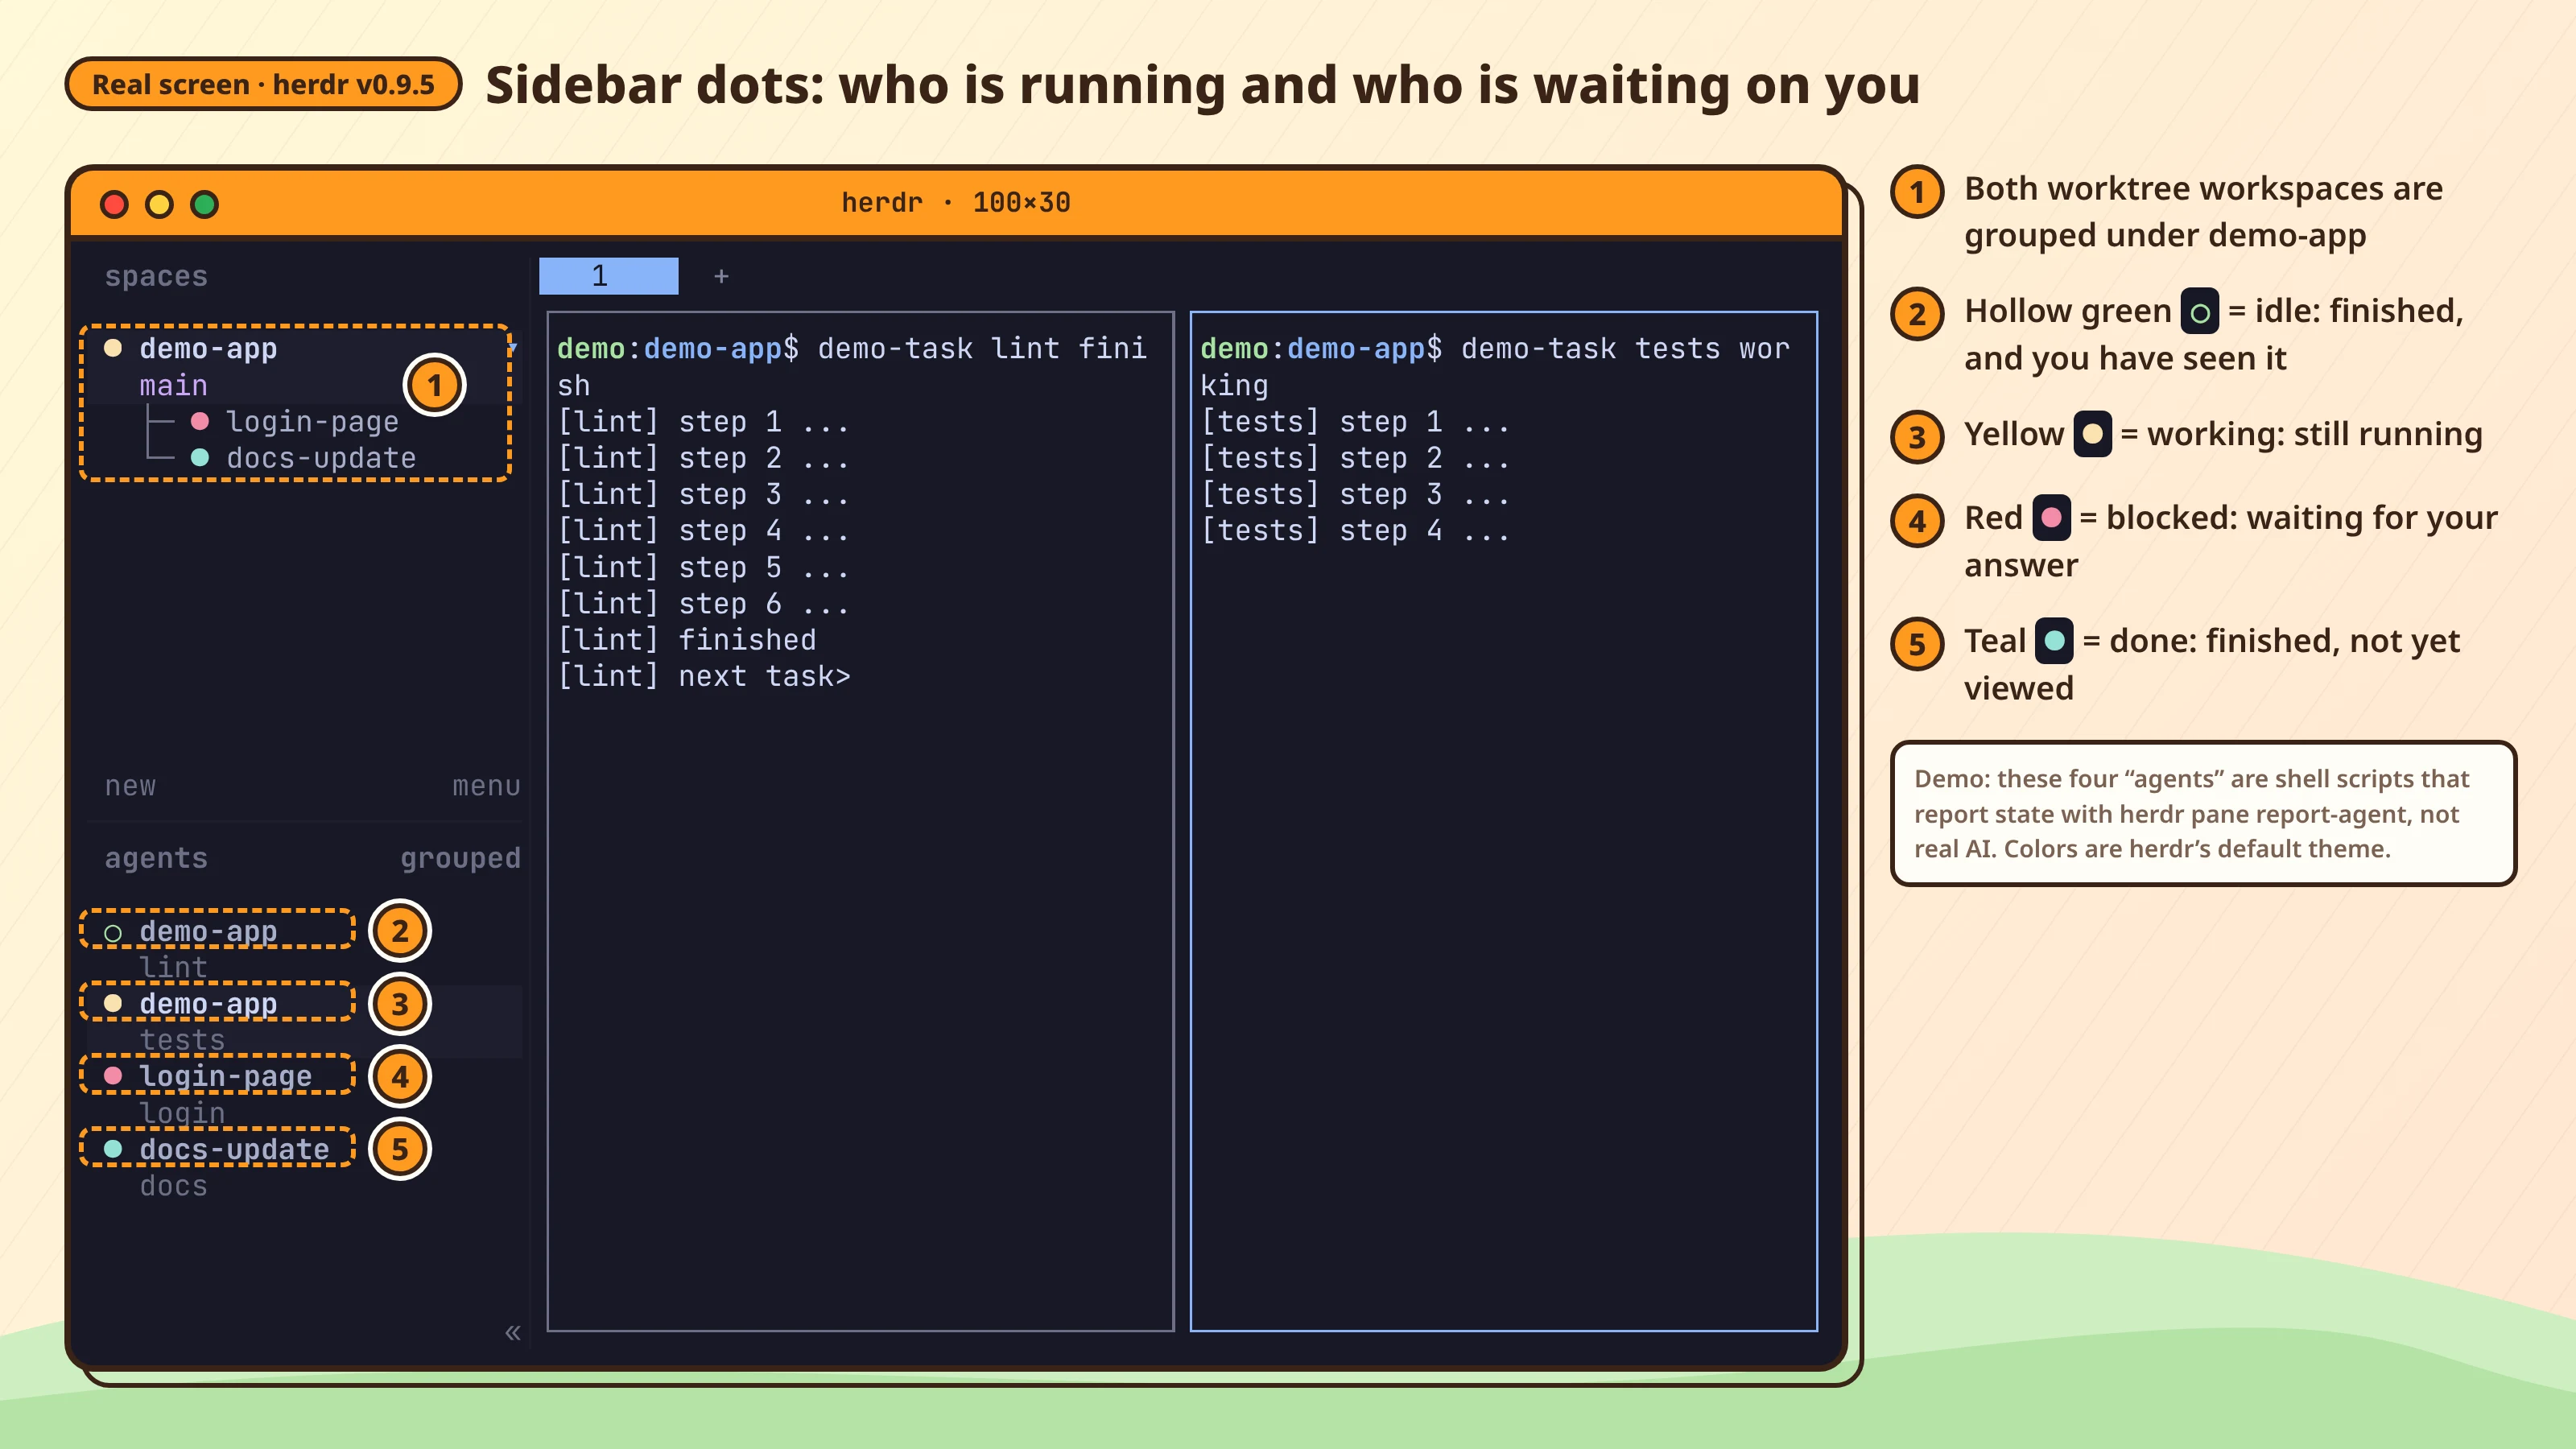 Real screen (herdr default theme): yellow dot = working, red = blocked, teal = done, hollow green = idle. The demo “agents” are shell scripts reporting state with herdr pane report-agent, not Claude Code or Codex.
The sidebar only shows dots. To see the state names written out, or to find a stuck agent quickly, press prefix+g to open the Go to list.
In the list, press b to show only blocked agents; w, i, and d show only working, idle, and done, and a shows all. Pick a row with the arrow keys and press Enter to jump there.
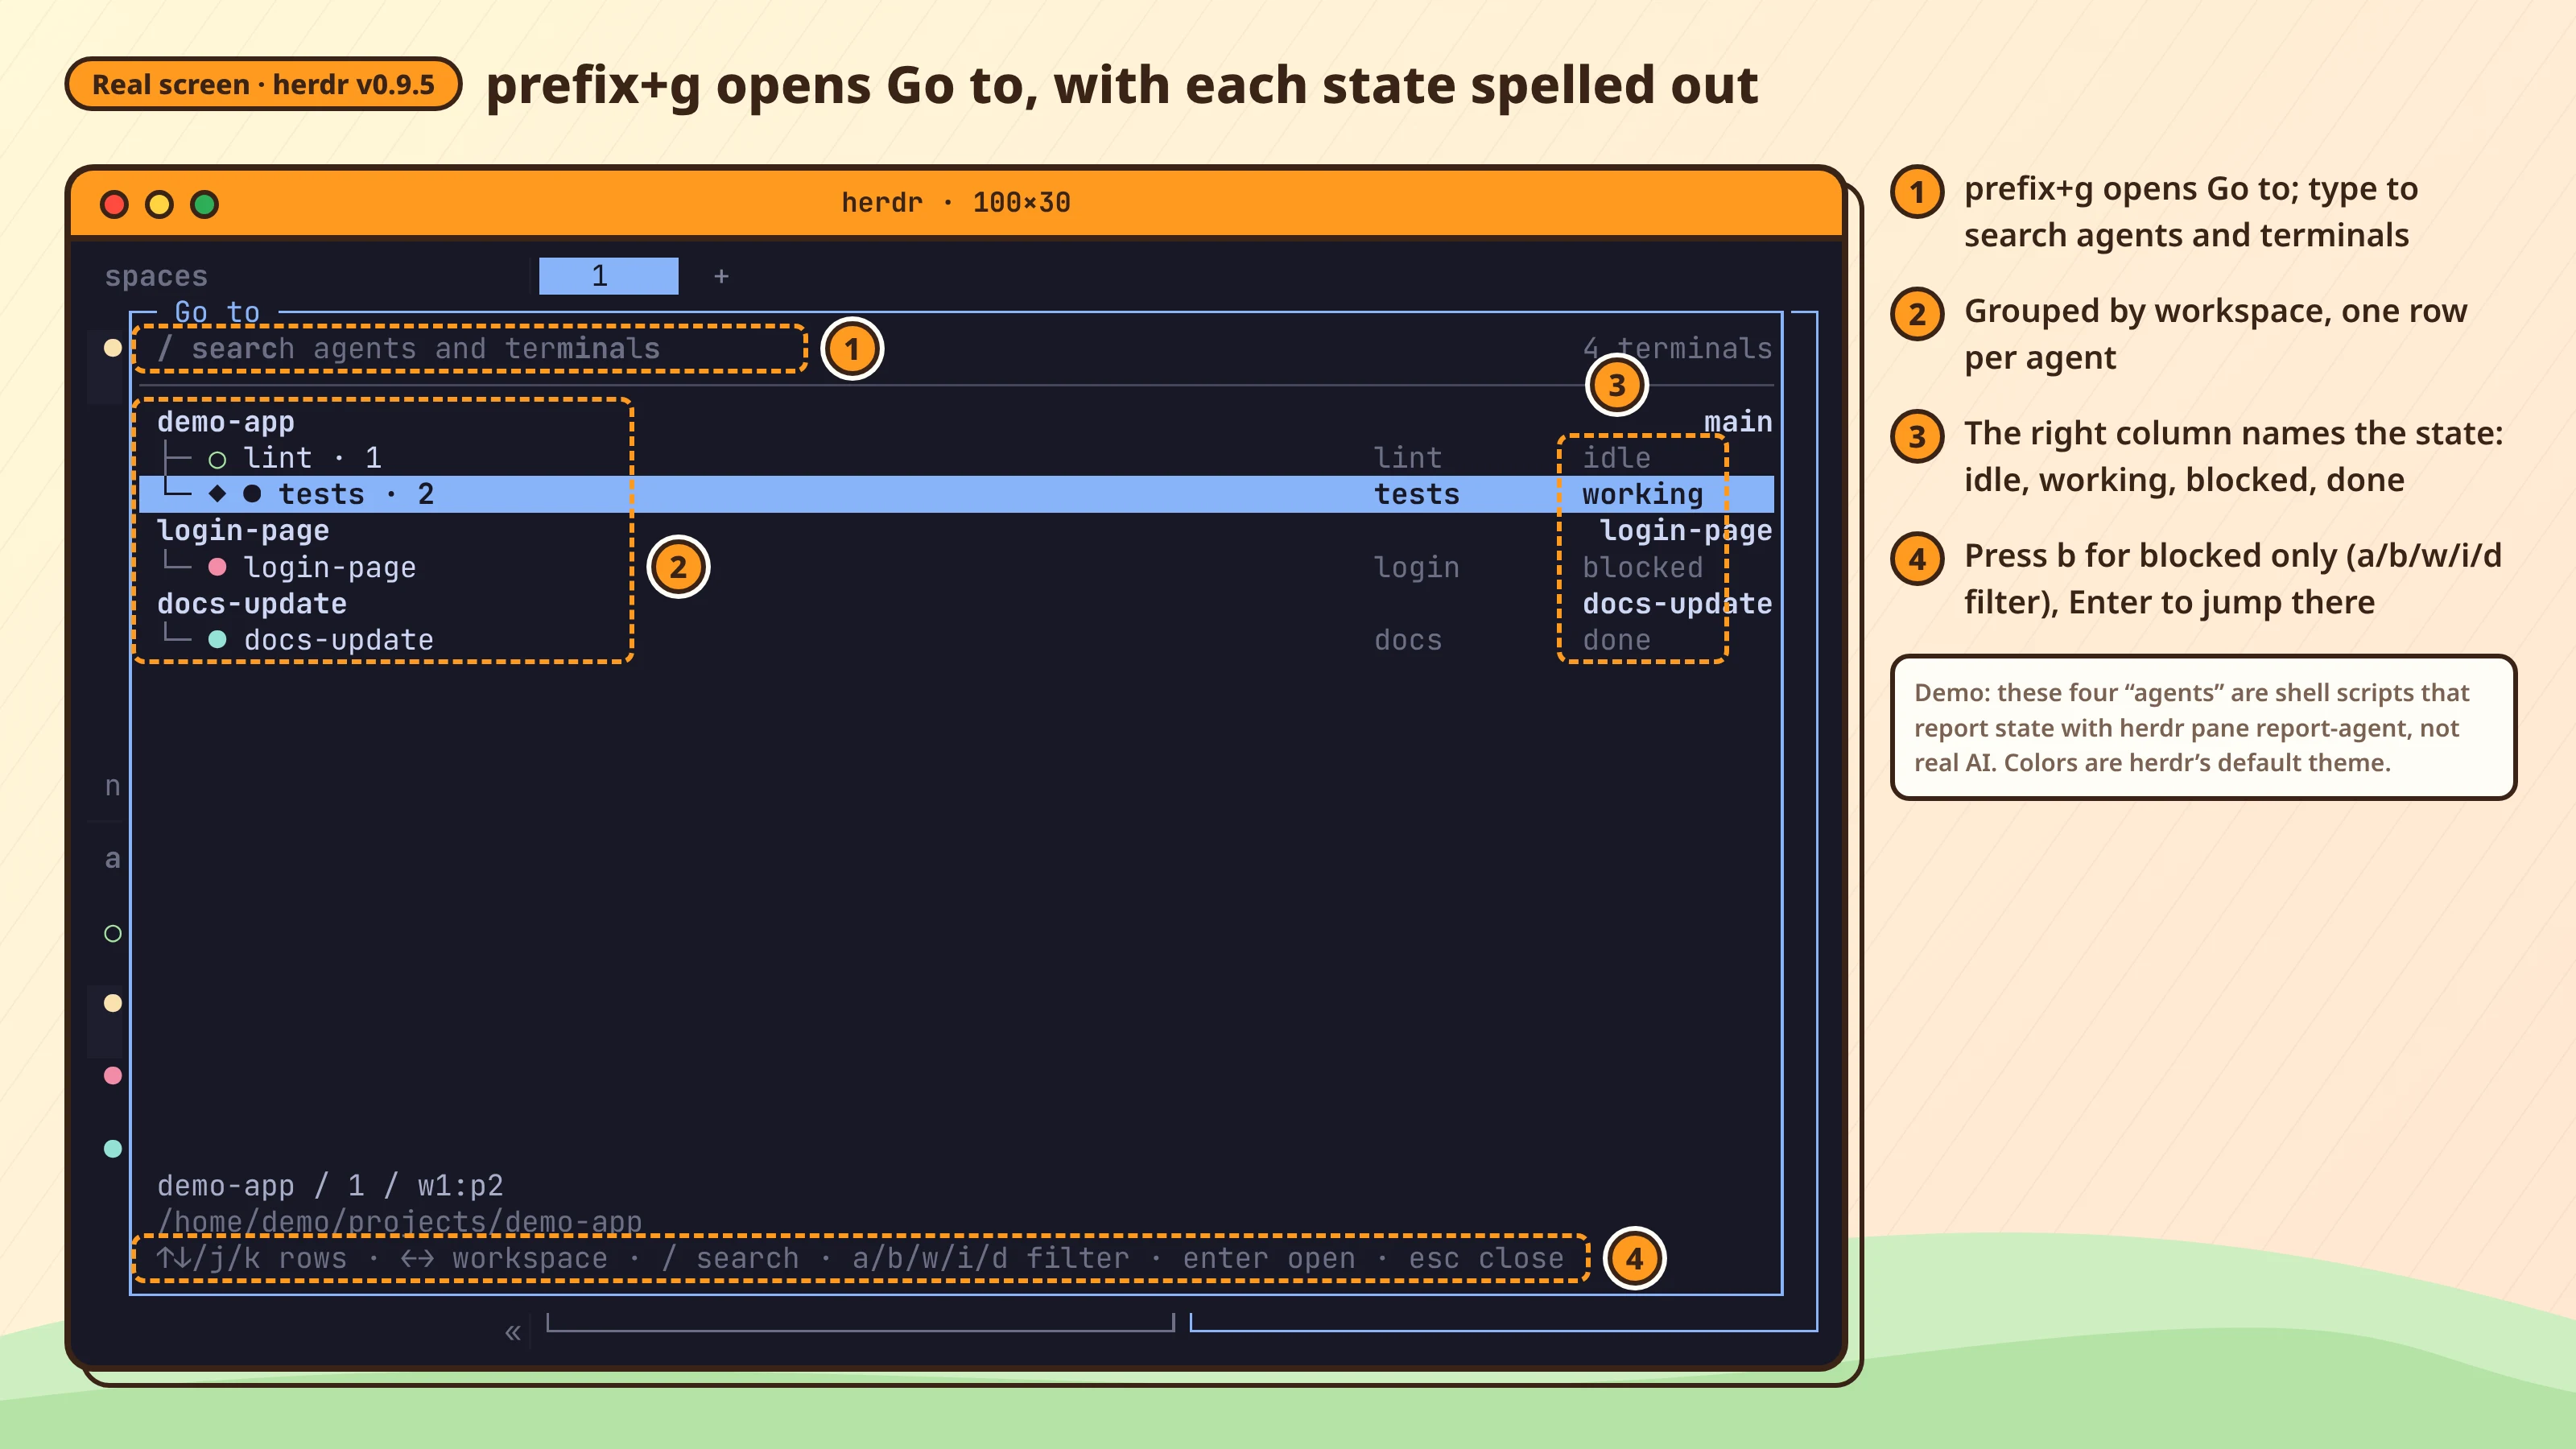 Real screen: prefix+g opens Go to with each state written out; press b to keep only the blocked row, then Enter to jump there. The demo “agents” are shell scripts reporting state with herdr pane report-agent, not Claude Code or Codex.
Idle is not approval
The official Agents page says blocked detection is deliberately strict: an unusual new prompt that herdr has not seen before may first show as idle instead of blocked. The same page says “idle status is not authorization to approve an action,” which means seeing idle does not make it safe to approve.
So after you jump to the pane, read it carefully before you click Allow. That is the same point I made about human-agent trust and approval fatigue in OWASP Agentic Top 10 Checklist: Audit Your AI Workflow.
If a state looks wrong, run the line below to see why herdr classified it that way; see Agents:
1
herdr agent explain <target>
Notifications are off by default
herdr does not show notifications by default. The delivery setting under [ui.toast] in the config file decides where they appear:
delivery | Where notifications appear |
|---|---|
off (default) | Nowhere; no notifications |
herdr | Inside herdr |
system | Your operating system’s notifications; on macOS, herdr tries terminal-notifier first |
To turn on notifications inside herdr, add this to the config file ~/.config/herdr/config.toml:
1
2
[ui.toast]
delivery = "herdr"
Save the file, then run the line below, or press prefix+shift+r, to apply it:
1
herdr server reload-config
If you use system, the official docs suggest installing terminal-notifier on macOS first:
1
brew install terminal-notifier
For the other options, see Configuration or the Config reference.
Step 6: Detach, then come back
To leave, press prefix+q (ctrl+b, then q), or just close the terminal window. According to the Quick start, running herdr again later reattaches to the same session. Here is what happens to your agents in each case:
flowchart TD
  A[Agent runs in pane] --> B{What happens?}
  B -->|"prefix+q or close window"| C[Server, agents keep running]
  C -->|run herdr again| A
  B -->|"Server restart, reboot, shutdown"| D[All processes end]
  D -->|run herdr again| E[Layout restored]
  E -->|integration installed| F[Conversation resumes]
  E -->|no integration| G[Conversation not resumed]
  B -->|herdr server stop| H["Session ends, agents stop"]
For the restart path, the README says “the original processes do not survive,” and that includes agents. Layout in the diagram means the arrangement of workspaces, tabs, and panes, and the integration is the one from Step 4. For the full table of what survives and what does not, see the official Session state page.
If you work on a remote machine over SSH, run herdr on the remote host, so work can continue after the connection drops. You can also point herdr at a host with --remote; see How to work:
1
herdr --remote <host>
To shut everything down, run:
1
herdr server stop
Officially, that ends the session and stops its panes. Note that this stops every agent still running in those panes.
Keyboard cheatsheet
Press prefix+? when you forget a shortcut.
| Keys | Action |
|---|---|
prefix+v / prefix+minus | Split a pane right / down |
prefix+h / j / k / l | Move to the pane on the left / below / above / right |
prefix+c | New tab (a naming window opens first; press Enter to create it) |
prefix+w | Open workspace navigation to switch workspaces |
prefix+shift+n | New workspace |
prefix+shift+g | New worktree |
prefix+shift+d | Close the selected workspace |
prefix+g | Open Go to (then b to show blocked only) |
prefix+z | Zoom the current pane |
prefix+x | Close the current pane |
prefix+q | Detach |
prefix+? | Show every shortcut |
Next step
There is also an official skill that lets an agent operate herdr. The line below prints content that matches your current version:
1
herdr --skill
I recommend reading any third-party skill before you install it; Third-Party Skills and MCP Servers: The New Attack Surface in Your Coding Agent explains why.
Further reading: the herdr README, the v0.9.5 release, the docs home, Install, Quick start, Concepts, Keyboard, Agents, Integrations, Session state, Configuration, Windows support, and the Homebrew formula.