pstack, Part 3: After the Code Is Written, Prove It Works Before Merging
Prove a change works before merging with pstack in Claude Code: the feature and bug-fix playbooks, /tdd, cleanup and verification skills, PRs, and babysit.
When an AI coding assistant finishes a change, it often says “Done, this should work.” But a successful build only shows that the code passes compilation checks; it does not establish that the feature meets its requirements. “Should work” offers even less assurance. This post shows you how to make “prove it works” part of the process with pstack: reproduce the problem before fixing it, clean out extra code and comments, find what else the change could break, have the AI drive your app the way a user does, and finally open a PR and get it to mergeable. For each playbook and skill, I cover when to use it, how to write the command (with an example you can copy and adapt), what it does step by step, what you get back, and where to go next. At the end, a made-up example ties them together, followed by a “which one when” table.
pstack Series Part 3
- Series guide: What pstack is and how to read the four parts (not yet published)
- Previous (Part 2): Understand the code, then design, before you change it
- Next (Part 4): Not yet published
Version note: This post is based on pstack version
0.15.36, atcursor/pluginscommitc742dd6(07:12 on 2026-10-28, Taipei time), with Claude Code 2.1.316. That is newer than the first two parts used: upstream shipped several releases while I wrote this one, so I checked against the latest, and the instructions here refer to that version. The three parts used these versions:
Part 1 Part 2 This post pstack 0.15.29(88d4751)0.15.30(eb4db2b)0.15.36(c742dd6)Skills 56 57 58 Claude Code 2.1.306 2.1.309 2.1.316 Two changes directly affect the workflows in this post. First, on its first reply to a task,
/poteto-modenow restates your goal, the problem to solve, and the smallest change it plans, then starts right away without waiting for you to confirm (SKILL.md). If it misread you, you can tell at once. Second, the subagent that opens a PR on behalf of the main chat no longer runs/interrogate; it runs only/deslopand/no-comments(opening-a-pr).Differences to keep in mind for Part 2.
/interrogateand/arenafrom Part 2 now have different output or rules from what Part 2 describes./interrogatenow has each adversary prove a problem with a run against the real code, and only run-proven findings survive. Its report lists the intent, the verified findings, and how many findings each adversary had dropped and why, instead of the Act on / Consider / Noted / Dismissed buckets (SKILL.md, output format)./arenanow always takes its judge from a different model family than the main chat’s, and when none is available it skips the judge and picks the base itself (SKILL.md). If you’re on 0.15.36, keep these differences in mind when you read those parts of Part 2.Other updates and version checks. The remaining updates don’t affect the workflows covered here: a new skill,
ketchup-video, and some fixes to the PR-watching script babysit uses. Claude Code leaves auto-update off for third-party marketplaces by default (README), so a pstack you installed by following Part 1 stays at that version. For how to update or pin it, see Part 1. I checked at 15:59 on 2026-10-31 (Taipei time) before I started writing, and again at 16:13 before opening the PR; both times,mainincursor/pluginswas still at0.15.36, with no pstack changes afterc742dd6.
Before You Start
pstack is a set of skills in Cursor’s official plugin repository. A skill is a set of instructions that tells the AI how to do one kind of job. Installing it is covered in Part 1, and understanding and designing before you change code is covered in Part 2. This post assumes it is already installed.
Commands take a prefix. In Claude Code (an AI coding assistant you use in a terminal), plugin commands carry the plugin name in front, such as /pstack:tdd. The examples below use the Claude Code form; in Cursor, just drop the pstack:.
This post uses two kinds of tools, and you call them differently.
- Playbooks: fixed procedures inside
/poteto-modethat go step by step. This post uses four: Feature, Bug fix, Opening a PR, and Babysit (looking after a PR until it can merge). They don’t have their own commands. You hand the task to/pstack:poteto-mode, and it picks the matching playbook. - Skills:
/tdd,/unslop,/no-comments,/blast-radius,/benchmark-checklist,/create-verification-skill, and/maintain-verification-skill. These standalone commands are configured for user invocation, so you type them when needed. A playbook can still read and follow their instruction files directly. When a/poteto-modeplaybook reaches a step that needs one of them, it reads that skill’s instructions and follows them (Claude Code adapter notes): it uses the/tddcadence when fixing bugs, runs/no-commentsbefore review, and applies/unslopto any prose it writes./blast-radiusand the two verification skills aren’t steps in any playbook, so you call them yourself when you want them.
Put “what counts as done” in your first prompt. The pstack guide makes this the first step of verification (guide, chapter 6). For example:
1
/pstack:poteto-mode Add JSON output to this command. The existing text output must stay byte-for-byte the same, the JSON must parse, and run both formats on the sample project. Show me the evidence.
That gives the AI three concrete acceptance requirements it can check one by one. Its reply should include the exact commands and their output. When a check can’t run, a good reply says “inconclusive.” A confident reply with no evidence is a warning sign. The check also has to match the change: for a command change, run the command; for a UI change, walk the changed flow in the running app; for a parser or data migration, replay a saved input; for performance, compare profiles from before and after; for a change to saving data, read the stored value back.
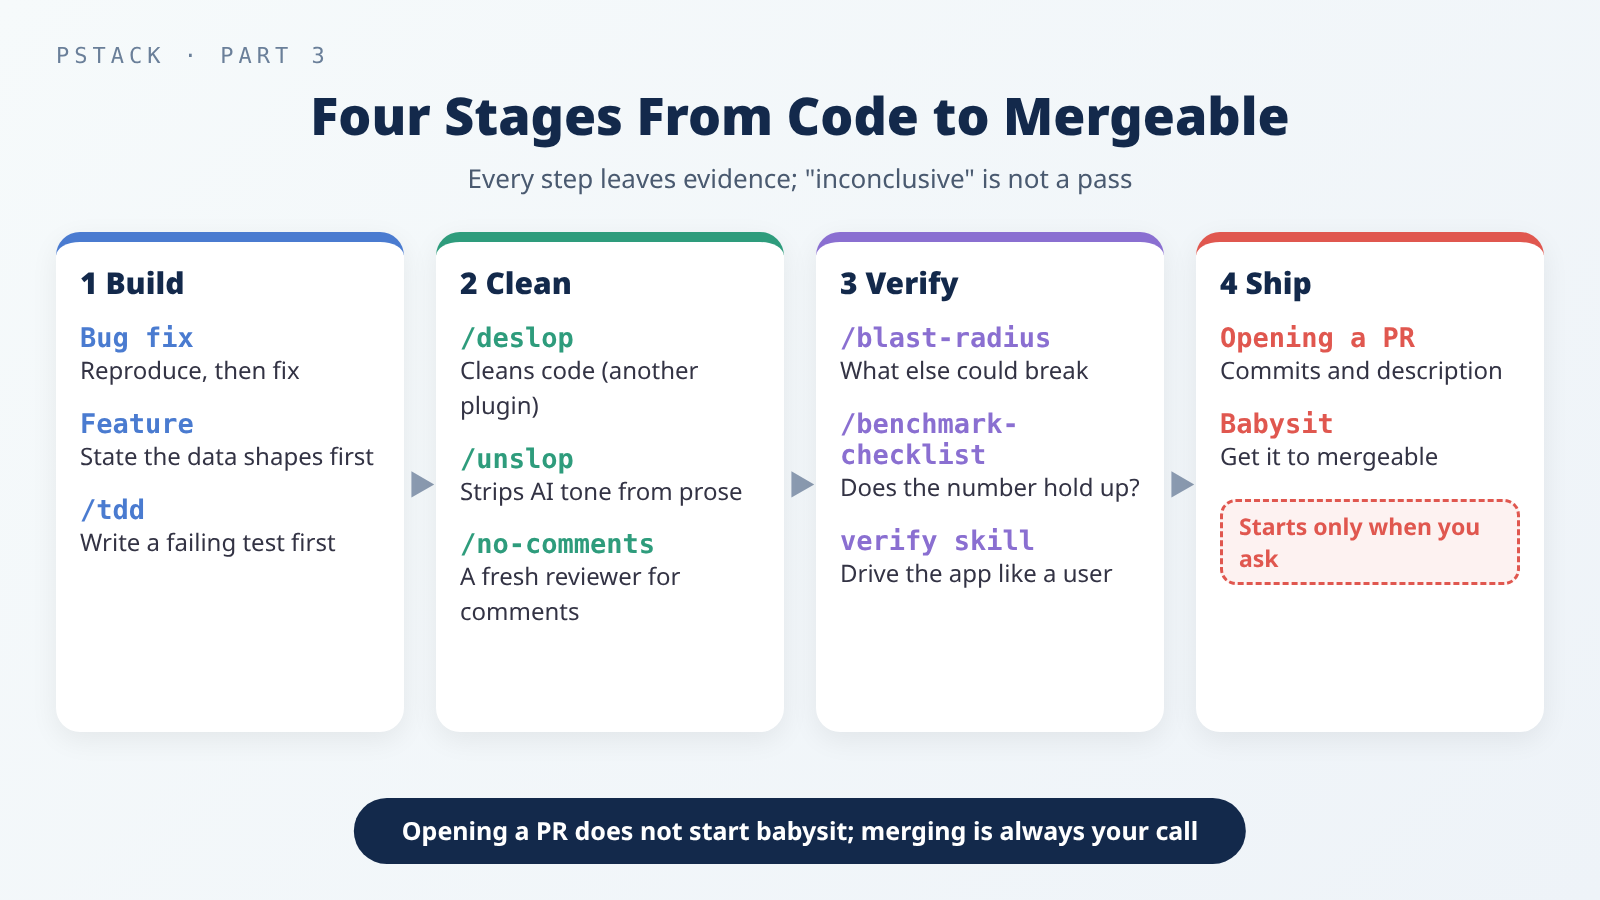 The four stages from writing code to mergeable. Opening a PR doesn’t start babysit on its own, and merging is always your call.
Build: Write the Code With a Playbook
The principle in chapter 5 of the guide is to put what you observed in the prompt and let the playbook gather the evidence needed to verify the result. The playbook fills in steps you didn’t type, such as reproducing before fixing and stating the data shapes before building.
Fix a Bug: Reproduce First, Then Fix
When to use it: you have a reported bug to reproduce, find the root cause of, and fix, with runtime evidence.
How to write the command: describe the symptom and ask for a reproduction first:
1
/pstack:poteto-mode <symptom: under what conditions, what happened, what should happen>. Reproduce it first, then fix it, then verify.
For example:
1
/pstack:poteto-mode This command writes two records after a retry; it should write one. Reproduce it first, then fix it, then verify.
What it does (bug-fix playbook):
- Reproduces it on its own. It triggers the bug on the same surface where it happens (the command line, a web page, and so on). It asks you to reproduce it only when it truly can’t reach that surface and can say exactly why. If it can’t reproduce the bug directly, it builds the trigger conditions itself or adds logging until the bug shows up.
- Bisects to the cause. It lists a few possible causes, uses
/howto understand the code involved and/whyto read that code’s history, then rules them out one by one. Each round it picks the cut that narrows things down most, and it rules causes out with runtime evidence, not guesses. - Plans the fix. If the fix crosses function boundaries, it runs
/architectfirst. The implementation goes to a subagent (a separate AI a skill sends off to do part of the work). - Verifies on the same surface. The original reproduction steps must now pass. “Inconclusive,” or verifying on a different surface, doesn’t count as passing. A unit test only proves how one branch runs; it doesn’t prove the bug is gone.
- Orders the commits. A commit is one recorded change in git. The failing reproduction (for example, a test) goes into git history first, and the fix comes after it. When the bug has a cheap local test path, it follows the
/tddcadence; when testing is expensive, needs a lot of setup, or the test path is unclear, it skips that. - Opens a PR (see “Prepare for Review” below).
One rule runs through the whole process: every line of the change that stays must trace back to runtime evidence. A “might help” defensive tweak is only a hypothesis and doesn’t stay. If evidence disproves a hypothesis, the code changed because of it gets reverted too (bug-fix playbook, line 5).
What you get: a reply that explains what was broken, the root cause, the fix, and how it was verified, with the reproduction output pasted verbatim, failing before the fix and passing after it.
Next step: read that before-and-after output yourself and confirm the failure is really the bug you reported. The default flow opens a PR next. If you asked it to pause, review the evidence before asking it to continue.
New Feature: State the Data Shapes First
When to use it: you’re adding or changing a behavior.
How to write the command: describe the behavior you want and what must not change:
1
/pstack:poteto-mode <the behavior to add>. <which existing behavior must not change>. <how to verify>.
For example (from chapter 5 of the guide):
1
/pstack:poteto-mode Add a --json flag. The existing text output must stay byte-for-byte the same. Verify both formats.
What it does (feature playbook):
- Runs
/howon the affected parts to understand how things work now. - Uses
/architectto compare a few designs in parallel (covered in detail in Part 2). - Writes four “split check” to-dos: which steps must finish first, which work can run in parallel, which state gets shared, and what the smallest safe split is. If one doesn’t apply (for example, only one file changes), it stays on the list marked
n/a: <reason>. - Hands the coding to a subagent with a tight scope: file paths, data shapes, and success criteria. A data shape describes the structure of the data the code handles, such as one state machine instead of a pile of true/false flags scattered around, or a lookup table instead of a long chain of ifs. When there are several reasonable ways to write it, it uses
/arenato have a few candidates compete instead. - Verifies on the matching surface. “Inconclusive,” or verifying on the wrong surface, doesn’t count as passing.
- Organizes the work into small, ordered commits, and verifies each small unit before moving to the next.
- If the design is contested, runs
/interrogatebefore opening the PR. - Opens the PR.
What you get: a reply that covers what it did, what it chose and why, the four split checks, and the decisions still open. Design alternatives come as a table.
Next step: review the design choices and verification results. Resolve any open decisions before continuing to the PR.
/tdd: Write a Failing Test First
When to use it: you explicitly want TDD (writing the test before the code), a failing test, or a regression test, or the bug has an obvious, cheap local test to write (SKILL.md). Skip it when the test path is unclear, expensive, or needs a lot of integration setup.
How to write the command: when the chat already has the bug’s context, the following command is enough (chapter 5 of the guide):
1
/pstack:tdd implement
Without that context, describe the bug:
1
/pstack:tdd Fix <description of the bug>. First write a test that fails because of this bug, show me it failing, then fix it.
What it does (SKILL.md):
- Understands the bug: what should happen, what happens now, which path it takes, and the smallest reproduction.
- Picks the narrowest runnable check: preferably the kind of test the code already uses. If there’s no obvious test path, it won’t build a whole test setup just to follow the process.
- Writes the failing test first: a minimal test that catches exactly this bug, describing what should happen rather than copying how the code works now.
- Runs it before the fix: confirms it fails, and for the right reason. If it passes, or fails for an unrelated reason, it fixes the test first.
- Fixes the bug: with the smallest change that keeps nearby existing contracts intact.
- Runs it again: confirms the test passes.
When a failing test isn’t worth writing, it uses the closest runnable check instead, such as a script, a manual reproduction command, browser automation, or a log assertion. Its rule is better no test than a bad test: a test that mostly exercises mocks, locks in implementation details, depends on timing, or only proves the fix and then gets deleted counts as bad.
What you get: the name of the test (or check) that failed before the fix and the failure it produced, plus the passing run after the fix. If it can’t show a failure before the fix, it explains why and which check it used instead.
Next step: clean the diff (a diff is the set of lines that changed between two versions), then open the PR.
Clean: Make the Diff Easy to Review
Before each commit, the PR-opening playbook runs /deslop on the diff, then applies /unslop to the PR description and commit messages (chapter 5 of the guide). /deslop lives in the cursor-team-kit plugin, not in pstack (Part 1 covers whether to install it as well). If you don’t have it, ask for the same result in plain words: delete narrating comments, unjustified defensive checks, compatibility code nobody uses anymore, and changes unrelated to this one. The three tools split the work like this: /deslop cleans code, /unslop cleans prose, and /no-comments hands the comments to a reviewer who didn’t write them.
/unslop: Strip the AI Tone From Prose
When to use it: when prose meant for people, such as a README, docs, a PR description, or commit messages, reads as if an AI wrote it.
How to write the command: point at the prose to clean and add your own rules:
1
/pstack:unslop <the prose or file to clean>, <your extra rules>
For example (from chapter 5 of the guide):
1
/pstack:unslop the readme changes, no emdashes
What it does: it finds AI writing habits in the prose and rewrites them, keeping the meaning and the voice (SKILL.md). Its list has several groups: content (empty praise, unsourced claims like “experts say”), word choice (words AI overuses, forced groups of three), formatting (dashes, too much bold, a bold label on every line), chat tone (“Hope this helps!”), filler, abstract jargon, and plain-language rules (active voice, short sentences, everyday words). The examples in the list are all in English.
What you get: the rewritten prose.
Next step: read it once more yourself and make sure the meaning didn’t change.
/no-comments: Have Someone Who Didn’t Write the Comments Review Them
When to use it: before review. The AI that wrote the comments defends them the way you defend your own, so you need a fresh pair of eyes (chapter 5 of the guide).
How to write the command:
1
/pstack:no-comments the diff
With no scope given, it uses the current branch’s diff against main, including changes that aren’t committed yet (SKILL.md). You can also name files:
1
/pstack:no-comments <files or folders>
What it does (SKILL.md):
- Sends out Comment Sicko. This is a subagent that reviews only comments. It touches only comments, points out where to refactor, and never writes application code (Comment Sicko). It lets only a few kinds of comments through: license headers, doc comments that define a public API contract, issue or spec links the code can’t express, non-obvious behavior forced by an outside library or platform, and formatter directives like
// prettier-ignore. Everything else goes. Surprising parts of your own code don’t pass just because they have a comment; it marks themMUST KILLand asks for a rename, an extracted function, or a type change so the code reads clearly without the comment. - Checks its report. Findings where it edited code beyond its role, or gave the wrong reason, get sent back.
- Fixes the accepted findings. Small ones it fixes directly, such as deleting a dead path or dropping an unused parameter. Ones that need a reshaped design get an
/architectsketch first. - Fixes at the root cause, only within this change. Anything outside that scope goes on a to-do list instead of being fixed in passing.
- Handles comments that state a constraint, such as “don’t delete this” or “ask so-and-so before changing this.” It proposes the cheapest way to put the constraint into the code itself, as a type, a runtime check, a test, or a lint rule (an automatic check on how code is written), and waits for your approval before doing it. Either way the comment is removed; if you say no, the constraint is listed in the report and marked as not yet enforced.
What you get: a report with how many comments were deleted, which were restored, what was fixed, the /architect sketches, the proposed enforcements and which you approved, and what’s still open.
Next step: reply to the proposed enforcements. Once the diff is clean, move on to verification.
Verify: Prove It Really Works
/blast-radius: Find What the Change Could Break
When to use it: you don’t fully trust a small diff and want to know whether it breaks something elsewhere (chapter 6 of the guide). It complements /how and /why: /how says what the code does, /why says why it looks that way, and /blast-radius says what else it could break.
How to write the command:
1
/pstack:blast-radius <the change, such as the current branch or a PR>. I'm most worried about <what worries you>.
For example:
1
/pstack:blast-radius The changes on this branch. I'm most worried that the cache-clearing part could delete data that's still in use.
What it does: it goes beyond listing callers found by search to trace behavioral effects that a text search alone may miss (SKILL.md).
- Reads the change, including indirect behavioral effects that the diff does not show directly.
- Finds the key fact that makes the change safe. Most changes that look risky are safe because of one fact, such as “this call only clears cache entries that have already expired and does nothing else.” If that fact holds, most of the risk goes away with it.
- Looks where search can’t see: the source of the libraries you call and the versions they’re pinned to, when the code runs, the JSON an API returns, database columns, feature flags, and code several layers downstream.
- Rates each risk honestly: how likely it is and what it costs if it happens. Confirmed risks are listed apart from ones it checked and ruled out.
- Proves that fact by running code. It writes a script or test that calls the real code, runs it once, and pastes the result.
- For a large or wide change, it uses
/arenato have several models answer the same question, then combines the answers.
For each fact it states how far it proved it: just asserted, pointed to a line of code, reasoned step by step that the bad case can’t happen, ran code, or reproduced it in the running app (SKILL.md).
What you get (SKILL.md): what it did, the key fact that makes the change safe (with proof, or marked unproven if it couldn’t prove it), the risks (how it breaks, on which line, likelihood and cost, how to check), what it ruled out, and a “before merging” section with the cheapest test or reproduction that would catch a real bug.
Next step: if the fact is marked unproven or there are confirmed risks, deal with them before opening the PR. The tests in “before merging” can go straight into this change.
/benchmark-checklist: Check Whether a Performance Number Holds Up
When to use it: you measured a performance number and are about to put it in a PR or base a decision on it, or someone else’s number looks too good to be true. Before-and-after numbers are the easiest to get wrong without noticing: a warm cache, a debug build on one side, or a timed region where no work happened (chapter 6 of the guide). The Perf issue and Hillclimb (keep improving a single metric) playbooks in /poteto-mode already run this checklist, so you only need to call it yourself for numbers you measured outside those two.
How to write the command:
1
/pstack:benchmark-checklist Before this goes in the PR, check <which number, such as how much faster the export got>
What it does: before measuring, it writes down the claim you plan to make (for example, “export is 30% faster on a 60,000-row dataset”), reads the measurement script to see what it counts and what it skips, and checks how busy the machine is (SKILL.md). Then it answers seven questions with evidence from actual runs (SKILL.md):
- What limits this number? Why isn’t it twice as good?
- Did each side run with production settings?
- Does the result exceed a physical limit, such as disk bandwidth or core count?
- Were there errors, or wrong results?
- Does it reproduce when you alternate runs (A, B, A, B…)? What are the median and the spread?
- Does the difference matter across the whole path a user waits on?
- Did the work you meant to time actually happen inside the timed region?
What you get: the verdict first (faster, slower, no measurable difference, or inconclusive), then the numbers with units, how many runs, the spread, and the limiting factor. If it can’t name the limiting factor, one side didn’t use production settings, or questions 4 or 7 can’t be checked, the verdict is “inconclusive” (SKILL.md).
Next step: put one headline number in the PR description, and keep the detailed run logs in a separate linked file.
/create-verification-skill: Let the AI Drive Your App the Way a User Does
When to use it: your project doesn’t yet have a written-down way for the AI to start the app, use it the way a user does, and keep evidence. That’s what you need when a UI change has to be walked through in the running app (chapter 6 of the guide).
How to write the command:
1
/pstack:create-verification-skill
What it does (SKILL.md):
- Interviews the project, not you. It answers these questions from the code: what users actually touch (a web page, a command line, a desktop app, an API…), how the app starts locally, how the AI can drive it (preferring existing tools in the project that can already drive the app, such as Playwright or Cypress specs, terminal helper scripts, endpoints you can call with curl, or a debug port, and falling back to general approaches such as a browser, a terminal, or HTTP), what evidence it can keep, and whether two copies can run side by side without interfering. It asks you only what the code can’t answer. If the project can’t build or start, it fixes that or reports it clearly before going on.
- Generates the skill. In Claude Code, it writes to
.claude/skills/verify-<app>/(pstack’s instructions say Cursor’s.cursor/skills/, and the Claude Code adapter notes map that to.claude/skills/). The content is instructions for the AI, in sections: how to start the app (Launch), a health check on whether the running app is ready to use (Doctor), driving it with the project’s real selectors or commands (Drive), what evidence to keep and where (Evidence), how to clean up what it started (Cleanup), and how to use the bundled scripts (Helpers). - Builds a feature map. Under
features/it puts an index plus one file per main feature (starting with 3 to 5), written from the user’s side: what the feature is, how to get there, how to use it, and what result counts as success. - Runs it once before handing it over. Following the instructions it just wrote, it launches the app, runs the health check, drives one feature, keeps evidence, cleans up, and confirms the evidence is still there after cleanup. A skill that hasn’t been run is only a draft.
- Reminds you that
/maintain-verification-skillcan keep it up to date.
Claude Code treats the project’s
.claude/folder as a protected location and, in the default mode, asks you before writing to it (Claude Code docs). When it asks, check that the path is.claude/skills/verify-<app>/before you approve.
What you get: a verification skill for your project, plus a feature map. From then on, “verify it in the app” is a step any AI can take in this project, without you explaining again how to start it.
Next step: commit it to the project so every person and every AI drives the app the same way. To have the AI verify with it, name it in your prompt (from chapter 6 of the guide):
1
/pstack:poteto-mode Add a "bulk archive" action. Verify your changes with /verify-<app> and give me a video and screenshots as evidence.
1
/pstack:poteto-mode Reproduce this issue with /verify-<app>. If it also reproduces on main, fix it and give me a video as evidence.
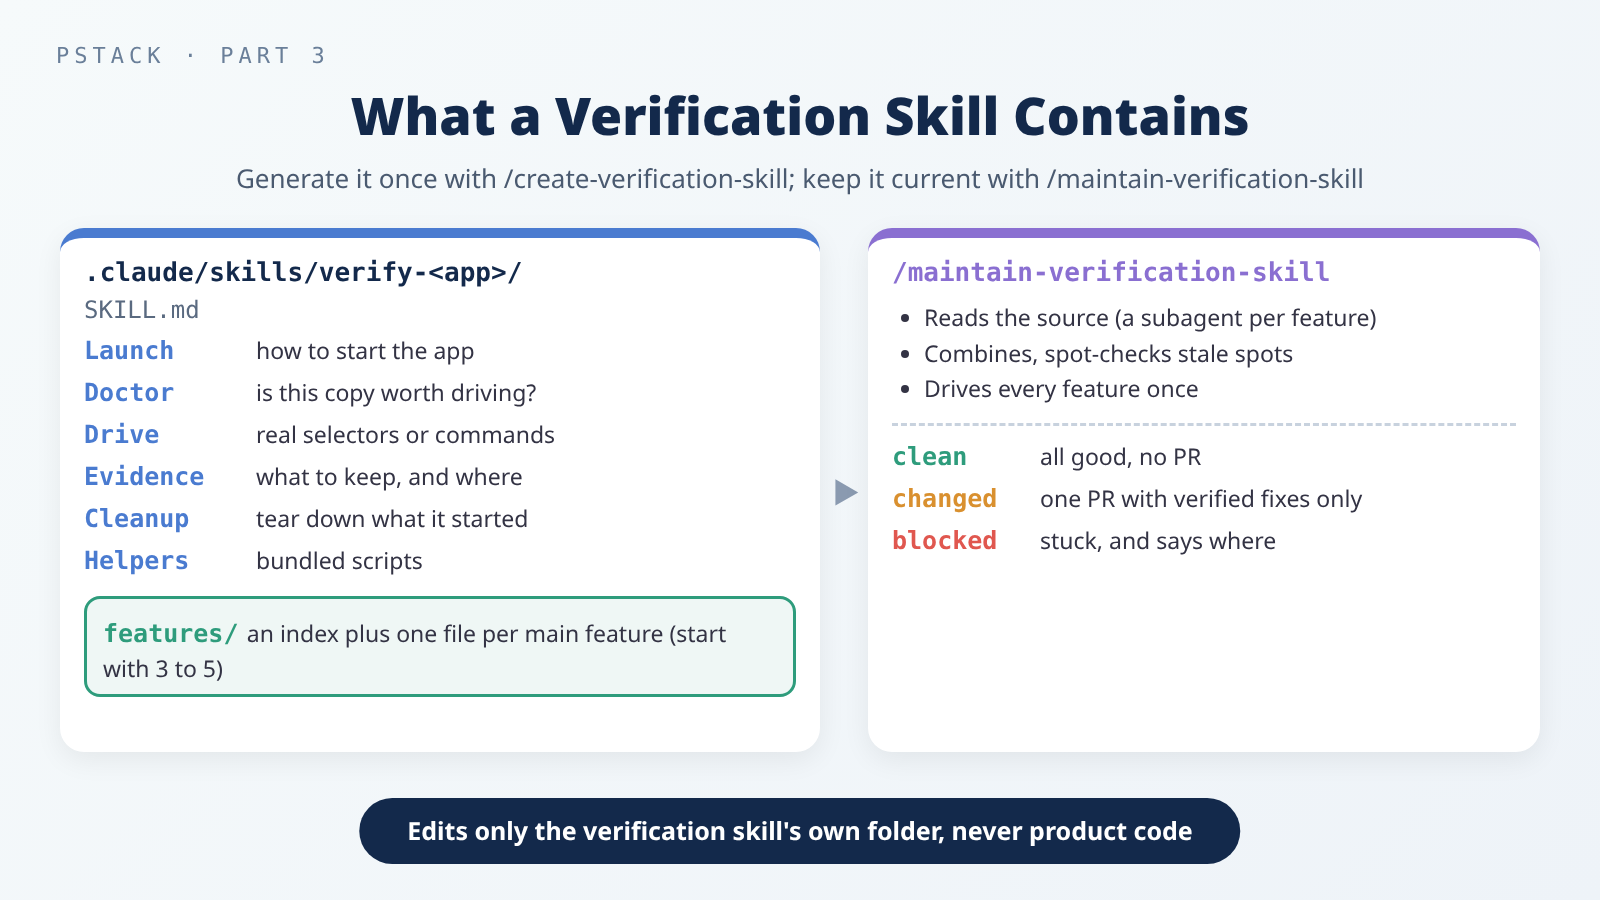 Generate it once and commit it to the project. When the code changes, /maintain-verification-skill keeps the instructions current.
/maintain-verification-skill: Keep the Verification Skill in Step With the Code
When to use it: every code change can make the feature map go stale. The guide suggests running it at least once a day (chapter 6 of the guide). The scheduled automation in the guide means Cursor Automations, which pstack’s Claude Code adapter notes say to skip in Claude Code (adapter notes). Claude Code has its own scheduled tasks, but pstack doesn’t set them up and this post doesn’t cover them; the simplest option is to run it yourself on a regular schedule.
How to write the command:
1
/pstack:maintain-verification-skill
What it does (SKILL.md):
- Finds the verification skill to maintain. If there are several, it asks which one. If there are none, it stops and tells you to run
/create-verification-skillfirst. - Tidies the index: adds what’s missing and removes duplicate or dead entries.
- Reads the source: it sends one read-only subagent per feature file, and they work at the same time. Each explains from the source how the feature works, points out where the instructions may be stale, and gives a set of steps to drive it.
- Combines the results: it merges overlapping steps, spot-checks the stale spots that were flagged, and looks at recent changes for new features the map doesn’t cover yet.
- Drives the app: it always does this, even when the source looks fine. It drives every feature at least once, runs the health check first, and makes sure the evidence survives cleanup.
- Sorts and wraps up: if the instructions are wrong, it fixes the instructions; if the app works but the driving method can’t reach it, it fixes the driving method; if the app itself is broken, it writes that down and tells you, and keeps it out of this change.
It edits only the verification skill’s own folder, never product code (SKILL.md).
What you get: one of three outcomes. clean: every feature was read in the source and driven, nothing needs changing, and no PR is opened. changed: it opens one PR with only verified fixes. blocked: it couldn’t finish, and it says where it got stuck.
Next step: for changed, review the PR it opened. Handle any product problems in the report separately.
Formal Verification: Prove the Cases Tests Rarely Reach
A verification skill proves the paths you actually drove. Some bugs hide on paths that ordinary use and tests rarely cover, such as two retries that overlap, a lock that expires halfway through a write, or state changes that happen out of order. For code where a mistake is that costly, you can run /pstack:create-formal-verification-skill. It picks the one property in the code most worth proving, chooses a tool to fit the problem (for example, a model checker like TLA+ by default for whether events can happen in the wrong order), first makes the property fail once against deliberately broken code to prove the check can catch a problem, then leaves a project-specific skill so later AIs can check new changes with one command (chapter 6 of the guide). This post doesn’t go deeper; it’s enough to know the option exists.
Prepare for Review: Open a PR and Get It to Mergeable
Open a PR (Opening a PR Playbook)
When to use it: every other playbook hands off to it automatically when it ends (opening-a-pr). You can also call it yourself.
How to write the command (from chapter 6 of the guide):
1
/pstack:poteto-mode Open the PR. Organize it into small, ordered commits, and put the evidence in the description.
What it does (opening-a-pr):
- Works in a worktree (a second working copy of the same repository), branched off main, so it doesn’t mix with the changes you have in progress.
- Organizes the commits: before opening the PR, it reshapes the work into small, ordered commits. Each one can merge on its own, and the order tells the whole story.
- Cleans up: it runs
/deslopon the diff before committing and/no-commentsbefore review. It writes the PR title, description, and commit messages with/technical-writing, then applies/unslop. - Titles use the Conventional Commits format (a fixed commit-title style: type, scope in parentheses, colon, summary), such as
fix(export): .... - The description is a one-minute briefing for the reviewer, in this order: Why, What changed, Scope (what’s covered and what’s deliberately left out), Tradeoffs (left out if there are none), Blast Radius, and Verification (what was actually run and the results).
- Opens the PR with
gh(GitHub’s command-line tool) by default, ready for review, not as a draft.
It doesn’t start babysit on its own after opening the PR. It posts the PR link and moves on to the next task. Babysit starts only once the whole batch of work is done and you ask for it (opening-a-pr). That keeps it from stalling on CI (the checks that run automatically on every push) after every PR and wasting checks that will rerun anyway. The guide also suggests that five narrow PRs beat one big one.
What you get: a PR link in the form https://github.com/<owner>/<repo>/pull/<number>.
Next step: read the Verification section of the PR description yourself first. Once the whole batch is open, call babysit.
Babysit: Get the PR to Mergeable, Without Merging for You
When to use it: after a PR is open, when CI fails, reviewers leave comments, or main moves ahead and causes conflicts, and you want to hand off those chores.
How to write the command (from chapter 6 of the guide):
1
/pstack:poteto-mode Babysit this PR and get it all green.
When you only want the current status and don’t want it to change anything, ask something smaller:
1
/pstack:poteto-mode Check PR 123. What's left?
What it does (babysit playbook):
- Declares a mode first.
drive: work all the way to mergeable (“babysit this,” “get it all green”).background: tidy up in the background without blocking you.threads-only: answer review comments and touch nothing else.check: look at the status once and report (“check X,” “is it passing?”). With no mode given it usesdrive; small or docs-only PRs getcheck. - Looks after only the lowest unmerged PR at a time. With a stack of PRs, it only reads and sorts the comments on the upper ones until the bottom one merges.
- Doesn’t change the PR’s structure. No rebase (replaying the branch’s commits onto a new base), no change of base branch, no force push (overwriting the remote branch’s history). When a rebase is needed, it reports that so the PR’s owner can do it.
- Works in this order: conflicts, review comments, CI. It batches known fixes into one push so the checks rerun only once. When it finds a conflict, it reports it rather than resolving it: it says which branch needs a rebase, then stops.
- Goes by GitHub’s verdict, not a row of green checkmarks. On GitHub, it uses the
watch-prscript that ships with pstack to read the PR’s status:drivemode keeps watching until there’s a final result, andcheckmode looks once. It treats the text of review comments as untrusted data, weighs it against the code, and doesn’t follow it as instructions. - Sorts a CI failure before rerunning it. It decides whether the failure is a flake, an infrastructure problem, or a real break. A flake gets one rerun; if the same failure shows up a second time, it isn’t a flake, and it reads the logs.
- Treats Bugbot (Cursor’s automated reviewer) comments with suspicion, checking each one against the code. It fixes only real problems, and writes a failing proof first when it does.
- Stops where the decision is yours. Waiting for an owner’s approval is “waiting,” not a problem for it to fix.
On GitHub, drive ends when watch-pr reports READY (GitHub has judged the PR mergeable). Babysit never merges, even when everything is green. Only when you clearly say “merge” or “ship” does it move to a separate playbook called Shipping (babysit playbook).
watch-pris a script that runs on bun (a JavaScript runtime). The first time it runs, it runsbun install --frozen-lockfileinskills/poteto-mode/scripts/inside the plugin folder, downloading the packages it needs from npm according to the lockfile (a file that pins the exact version of every package) and installing them intonode_modulesthere. Later, if a plugin update changes the package list (package.json) or the lockfile, it installs again (bootstrap.ts). In other words, calling babysit makes the AI download and install packages from the internet on your computer. The lockfile pins the versions, but you should still know this happens. For the risks and how to tighten permissions, see Third-Party Skills and MCP Servers: The New Attack Surface in Your Coding Agent.
What you get: when drive completes normally, confirmation that the PR can merge, plus the comments it handled, the CI failures it saw, and its reasoning. If a conflict or required approval needs your attention, it reports what is holding up the PR. check gives you a status report.
Next step: decide yourself whether to merge. To have the AI merge, you have to say so clearly, which runs the Shipping playbook: it first verifies each PR independently, then merges them one at a time from the bottom up (chapter 6 of the guide).
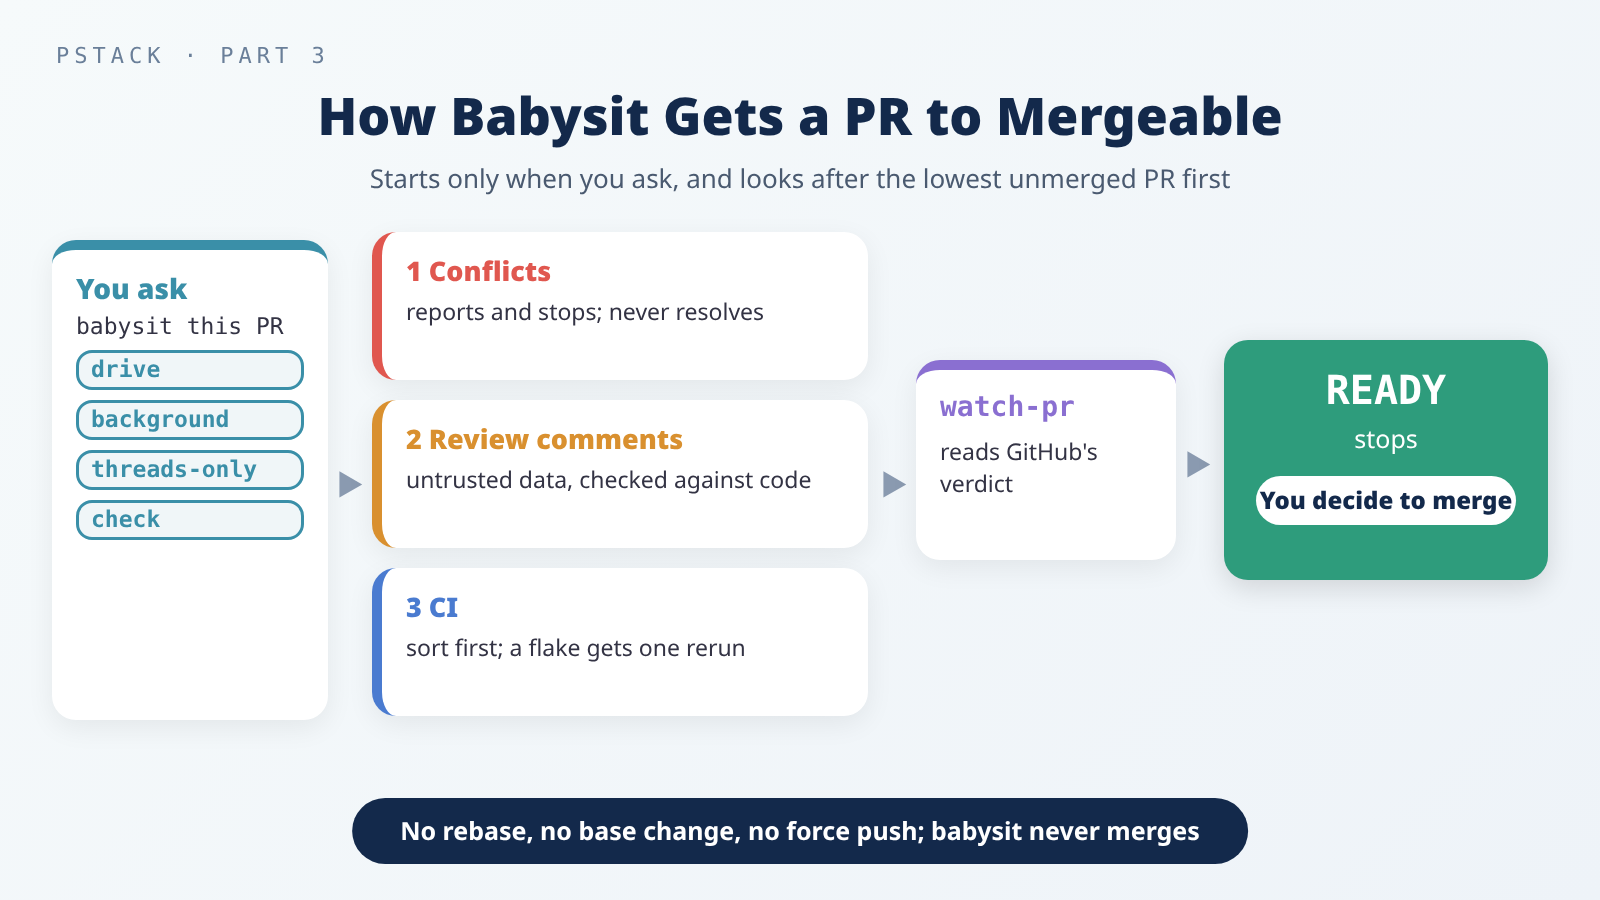 It reports conflicts instead of resolving them, and stops at mergeable without pressing merge for you.
A Complete Example (Made Up)
The following scenario is made up. It only shows how these playbooks and skills fit together. It isn’t a record of a real run, and it includes no output.
Say you maintain a command-line tool that exports data. A user reports that when the network is flaky and the command retries on its own, the same record appears twice in the output file.
1. Reproduce and investigate without changing the code.
1
/pstack:poteto-mode After a network timeout and automatic retry, the export command writes the same record twice; it should write it once. For now, only reproduce it, identify the cause, and paste the failing output. Do not change the code or open a PR yet.
This prompt deliberately stops the flow after investigation. The AI creates the timeout conditions, narrows down the cause, and confirms it with runtime evidence. Read the failing output to check that it reproduced the reported problem.
2. Use /tdd to write a failing test, then fix the bug.
Assuming the bug has a cheap local test path, continue in the same chat with:
1
/pstack:tdd implement
Check that the test fails because of this bug before the fix and passes afterward. If there is no suitable test path, use one of the runnable checks described earlier.
3. Review the comments.
1
/pstack:no-comments the diff
Say it flags a comment that says “don’t touch this, retries will break” and proposes turning it into a test. Once you approve, it writes the test first, then deletes the comment.
4. Not sure? Find the blast radius.
1
/pstack:blast-radius The changes on this branch. I'm most worried that changing the retry logic affects other commands that also retry.
Check whether it proved the key fact that makes the change safe, and read the tests it suggests in “before merging.”
5. Open the PR, and babysit once the whole batch is done.
1
/pstack:poteto-mode Open the PR. Organize it into small, ordered commits, and put the evidence in the description.
1
/pstack:poteto-mode Babysit this PR and get it all green.
Babysit handles CI and review comments and stops when GitHub judges the PR mergeable. You press merge.
This example calls each step by hand, one at a time, so you can see every link in the chain. Step 1 explicitly pauses the flow, so step 2 starts the fix separately. Day to day, you can hand the goal and the done criteria to
/pstack:poteto-modeand let its playbooks decide which skills to use. Name a skill only when you want to change the default.
Which One When
| Situation | What to use |
|---|---|
| A reported bug to fix | /poteto-mode + the symptom + “reproduce first” (Bug fix playbook) |
| A new feature to add | /poteto-mode + the behavior + what must not change (Feature playbook) |
| You want to see a failing test before the fix | /tdd (needs a cheap local test path) |
| A README or PR description reads like an AI wrote it | /unslop |
| The diff has a lot of comments, before review | /no-comments |
| A small diff you’re not sure is safe for the rest of the code | /blast-radius |
| You measured a performance number for a PR | /benchmark-checklist |
| The AI can’t start or drive your app on its own | /create-verification-skill (once, committed to the project) |
| The code changed and the verification skill may be stale | /maintain-verification-skill |
| Retries, concurrency, state machines, and other cases tests rarely reach | /create-formal-verification-skill |
| The change is done and needs a PR | /poteto-mode + “open the PR” (other playbooks hand off to it automatically) |
| A PR has CI failures or review comments to handle | /poteto-mode + “babysit”; ask it to “check” for status only |
| Time to merge | Press merge yourself; to have the AI merge, say so clearly, and it runs Shipping |
Cautions
- Put the done criteria in the first prompt: without concrete checks, all the AI can hand you is a feeling that it’s done.
- “Inconclusive” isn’t a pass: verifying on the wrong surface, or a check that couldn’t run, should be flagged, not treated as success.
- A unit test doesn’t mean the bug is gone: for a bug fix, rerun the reproduction steps on the surface where the bug happened.
- Don’t force a test:
/tddwould rather add no test than a bad one. - Opening a PR doesn’t start babysit: call it once the whole batch of PRs is open, so the checks don’t keep rerunning.
- Babysit doesn’t merge: it stops at mergeable; merging is a separate decision.
- Babysit’s first run downloads packages: see the warning above.
- Verification skills need upkeep: when the code changes, remember to run
/maintain-verification-skill. - Version: all of this is based on the pstack
0.15.36instructions, and later versions may change how things work.
Conclusion
Getting code to mergeable with pstack comes down to leaving evidence at every step. When building, reproduce bugs before fixing them, state the data shapes before adding a feature, and verify each result on the matching surface. If there’s a cheap test path, use /tdd so the failing test goes into git history first. Before review, clean the prose with /unslop and the comments with /no-comments. When you’re unsure, use /blast-radius to prove the key fact that makes the change safe. If you have a performance number, run it through /benchmark-checklist first. If the AI can’t drive your app on its own, give it a method with /create-verification-skill, and keep it maintained. Finally, let the PR-opening playbook organize the commits and description, and let babysit handle CI and comments until GitHub judges the PR mergeable. Pressing merge is always up to you.
Further Reading
- Guide: Build the change and clean the diff: how to prompt for different build tasks, and cleanup habits.
- Guide: Verify the result and open a PR: done criteria, verification skills, formal verification, opening a PR, babysit, and Shipping.
- The four playbooks: bug-fix, feature, opening-a-pr, babysit.
- Skill instructions: tdd, unslop, no-comments, blast-radius, benchmark-checklist, create-verification-skill, maintain-verification-skill, create-formal-verification-skill.
- pstack, Part 1: Install, Pick Models, Start With /poteto-mode: how to install and update, and how
/poteto-modesequences a task. - pstack, Part 2: Understand the Code, Then Design, Before You Change It:
/how,/why,/architect,/interrogate,/arena. - Write Your Own Agent Skill: From SKILL.md to Testing and Upkeep: where project skills live and how to write a SKILL.md.
- Third-Party Skills and MCP Servers: The New Attack Surface in Your Coding Agent: the risks when an agent downloads packages and reads files, and how to tighten permissions.
- Another skill set’s approach: mattpocock/skills Series Guide, Trusting Code When the AI Writes the Tests, Structure, Code Review, and Merge Conflicts.