Publish npm Packages Without Long-Lived Tokens: A Trusted Publishing Setup Guide
How to set up npm trusted publishing with GitHub Actions, what you get after it works, and how to retire old tokens.
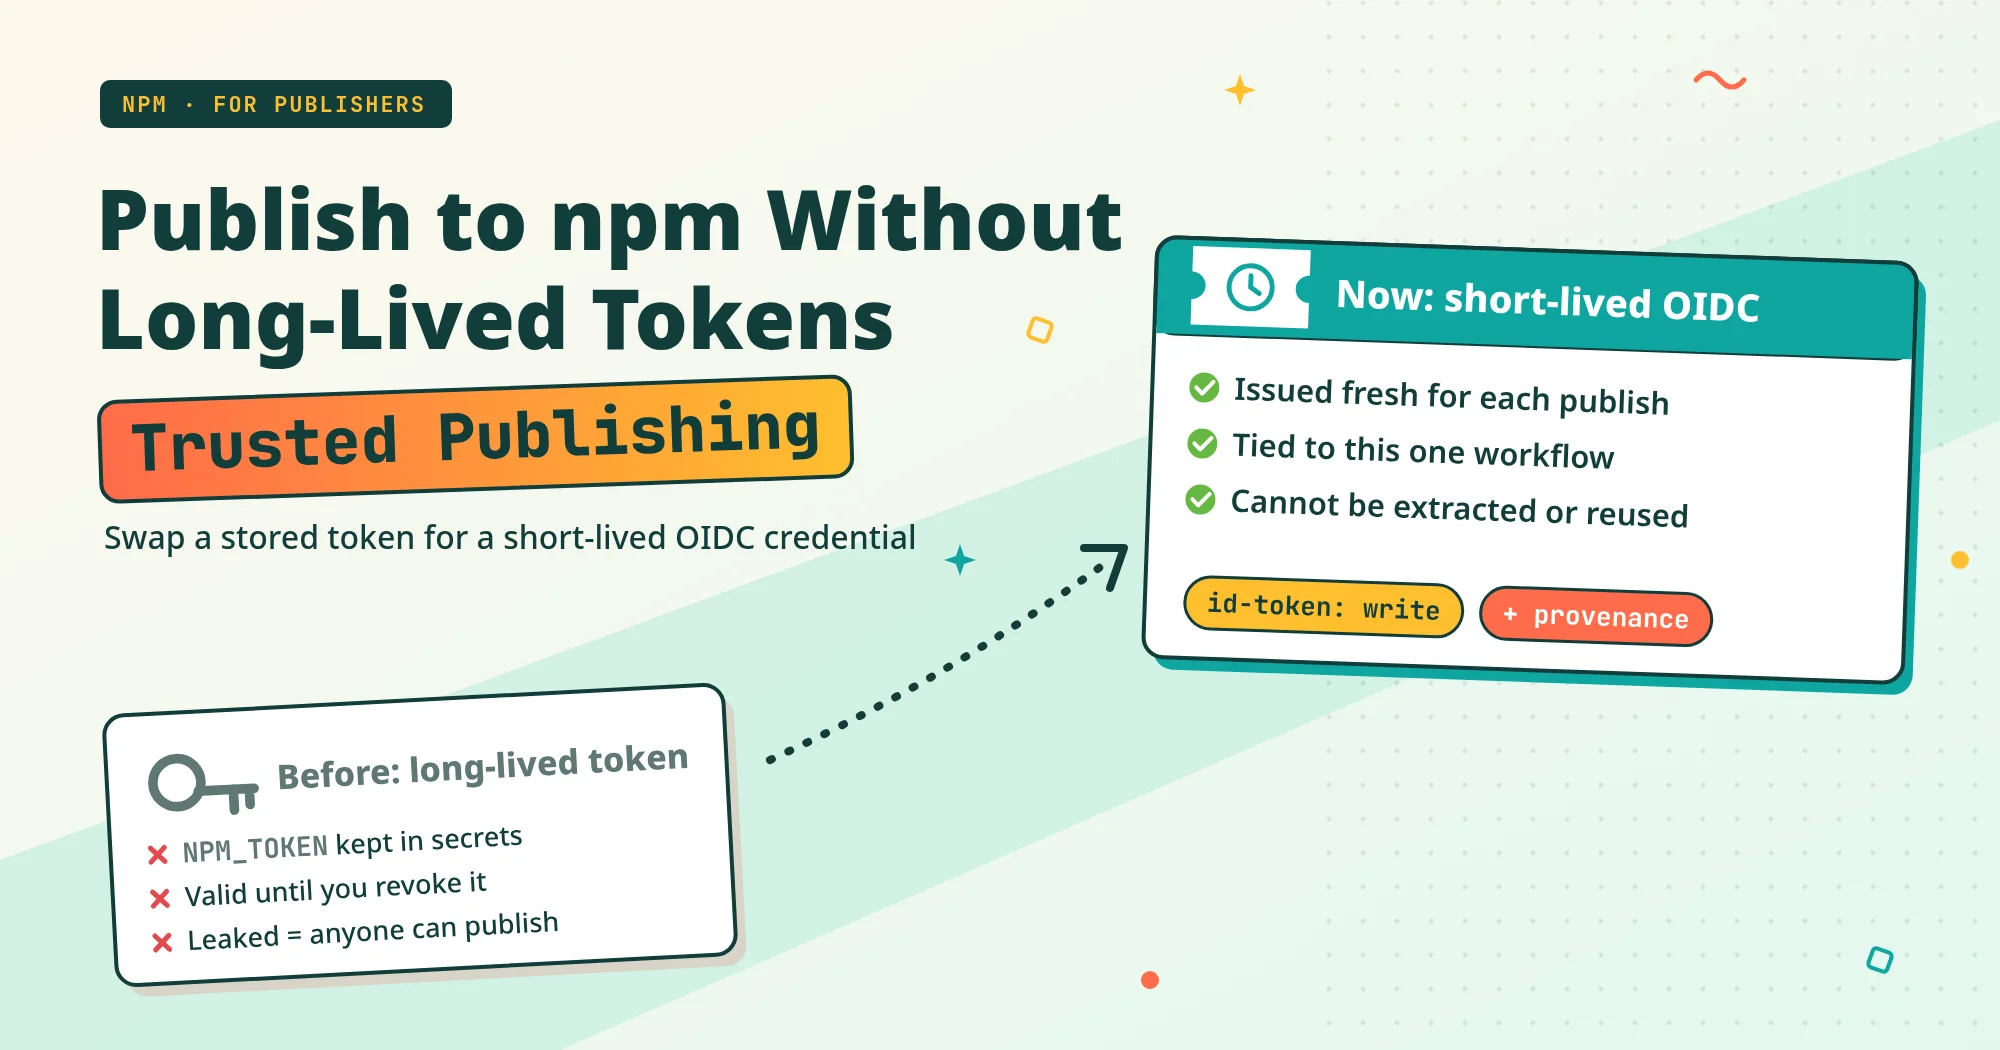
The short version: if GitHub Actions publishes your npm package, you can switch to npm’s trusted publishing and stop storing a long-lived token in CI. Once that works, you still need to retire your old tokens before the risk actually goes down.
A few terms first:
- npm package: code uploaded to the npm registry so others can install it with
npm install. Publishing means uploading a new version. - CI/CD: a pipeline that runs tests, builds, and publishes automatically when code is pushed.
- GitHub Actions: GitHub’s built-in CI/CD tool.
- Repo (repository): the place on GitHub that holds a project’s code.
- Workflow: a YAML file in the repo’s
.github/workflows/folder that says what to run automatically. - Runner: the machine that executes a workflow.
Why switch? A token is a passcode that stands in for your account password; whoever has it can do whatever that token allows in your name. If your automated publishing works by putting an NPM_TOKEN in GitHub Actions secrets (where GitHub stores passwords and other sensitive values), that is a long-lived token: it stays valid until it is revoked or expires. If it leaks, someone else can publish a new version as you.
Third-Party Skills and MCP Servers: The New Attack Surface in Your Coding Agent looks at this risk from the user’s side: in the Nx case, according to Nx’s security advisory, an attacker obtained an npm publish token through a GitHub Actions injection flaw. This post looks at the publisher side and removes one specific risk: a long-lived token sitting in CI. To be clear, trusted publishing cannot stop that kind of incident by itself. If malicious commands have already been injected into the workflow, it can still publish. To add a human check on each version, see “Stricter Options” later in this post.
This post covers only GitHub-hosted runners (machines provided by GitHub) and the matching settings on npmjs.com. For adding automated review to a workflow, see Automating PR Review With GitHub Actions and an AI Agent: This Site as an Example.
Version note: This post follows npm’s official guide, Trusted publishing for npm packages, as read on 2026-11-11. npm is still changing this feature (for example, configurations created after 2026-09-03 allow only stage publish by default). Treat the official docs as the source of truth for the current form and defaults.
What Trusted Publishing Is, and How It Works
In one sentence: trusted publishing lets npm verify a publish by which repository and which workflow it came from, so CI no longer needs to store a long-lived npm token.
It relies on OIDC (OpenID Connect), a standard that lets systems present proof of identity to each other. On each publish, GitHub issues a short-lived identity document (technically, a JWT) that names the repository and the workflow. npm checks it against the settings you saved on npmjs.com, and only then issues a short-lived credential for this publish. According to the docs, that credential is cryptographically signed, specific to your workflow, and cannot be extracted or reused.
The flow has four steps:
- The workflow starts on a GitHub-hosted runner. The job that publishes (a group of steps inside a workflow) needs the
id-token: writepermission to request an identity document. - GitHub issues an OIDC identity document that names the repository and the workflow.
- npm checks that the organization or user, the repository, and the workflow filename all match, then issues the short-lived credential.
- The job runs
npm publish. For a public repository and a public package, npm also attaches provenance automatically (a public record of which repository and workflow built that version).
One catch: npm accepts trusted publishers in addition to existing tokens and manual publishes. The npm CLI detects an OIDC environment and uses it first, falling back to traditional tokens only when OIDC is not available. So after setup, your old tokens can still publish until you shut them off in Step 4.
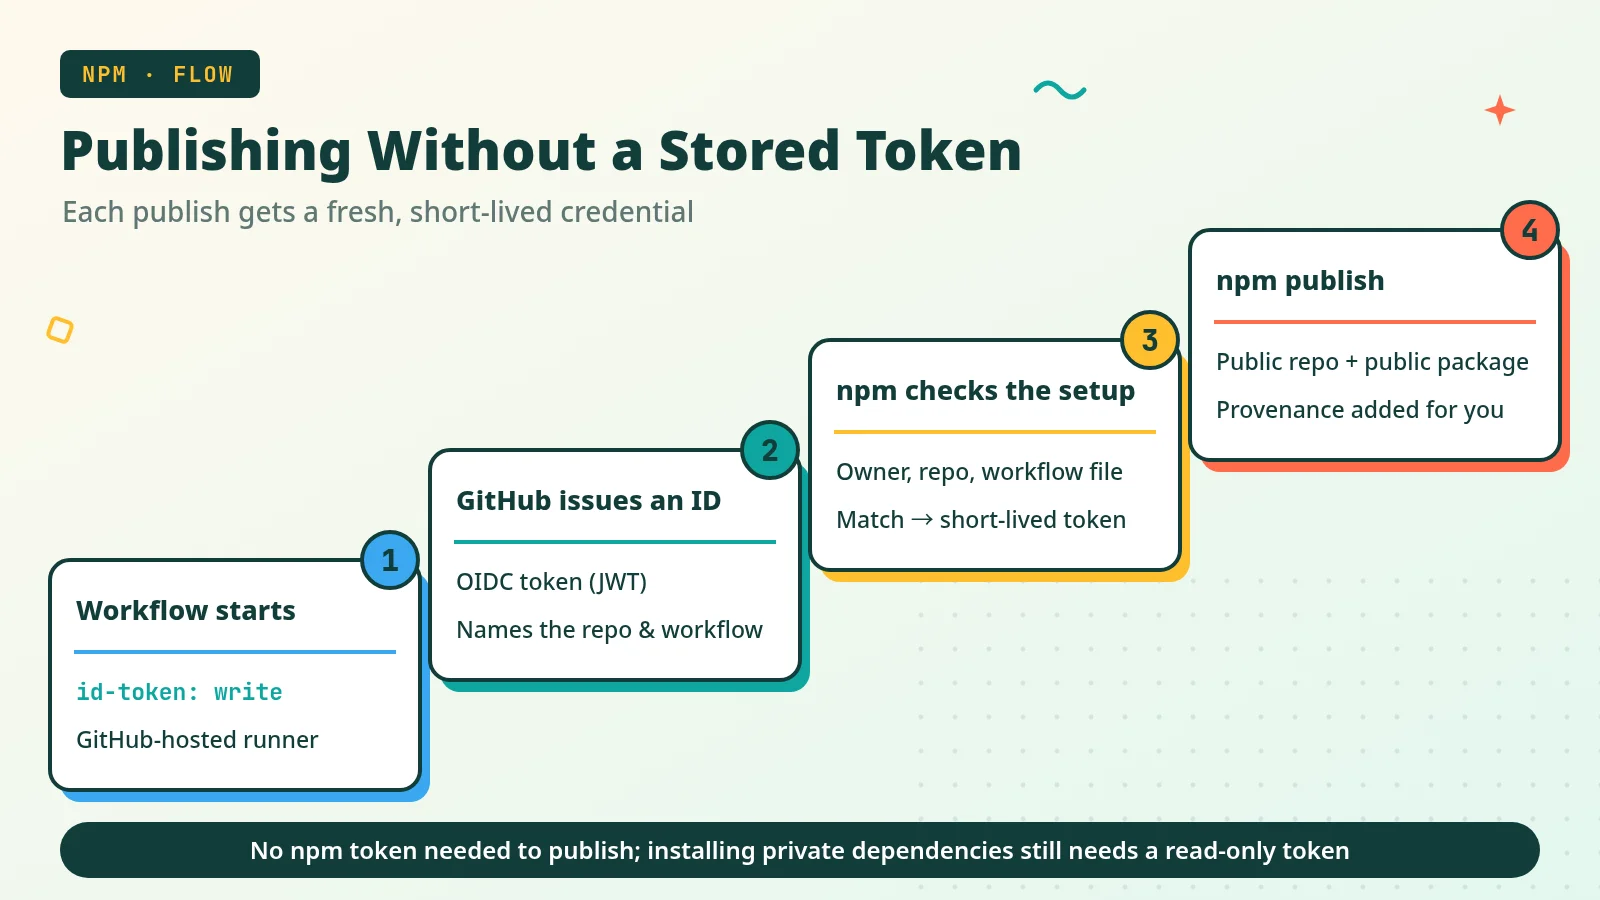 A concept illustration: GitHub Actions presents an identity, npm checks your settings, and only then issues a short-lived credential for this publish. A public repository plus a public package also gets provenance. Publishing itself needs no npm token; installing private dependencies still needs a read-only token.
When to Use It, and When You Cannot Yet
The short version: if you publish automatically with GitHub Actions on GitHub-hosted runners, it makes sense to switch now. Self-hosted runners are not supported yet.
Why now. npm’s docs say legacy tokens were removed in November 2025, leaving only granular access tokens (tokens you can limit by package, permission, and expiry date). The docs also say the ability to publish new versions directly with a granular token will be removed in January 2027. In other words, if your CI publishes directly with a token, you will need a different method by then. npm’s CI/CD guide also recommends trusted publishing instead of access tokens for publishing from CI.
Good fit: packages you publish automatically with GitHub Actions on GitHub-hosted runners. npm also supports GitLab.com shared runners and CircleCI cloud; see the same page. This post does not walk through those platforms.
Not yet: self-hosted runners (machines you run yourself). The docs say they are not currently supported, but are planned for future releases. The docs currently list only these three supported platforms.
What it does not cover:
- Installing private dependencies. Dependencies are other packages your project needs; if any of them are private, installing them still requires a read-only granular token (one that can read but not publish).
- Other npm commands. Trusted publishing covers publishing only; other commands such as
npm install,npm view, andnpm accessstill use traditional authentication when they need to authenticate.
Step 0: What You Need Before You Start
Before you begin, check these four things:
- Recent enough versions: npm CLI 11.5.1 or later and Node.js 22.14.0 or later are the official requirements. The official example uses Node 24, whose bundled npm (currently 11.19.x) already qualifies. The npm bundled with Node 22 is 10.x, which is below 11.5.1. If you need to stay on Node 22, upgrade npm before you publish, for example by adding a workflow step that runs
npm install -g npm@latest. - An exact
repository.url: therepository.urlfield inpackage.json(your package’s settings file, which records its name, version, and so on) must exactly match your GitHub repository, including letter case. A fork (a copy of someone else’s repo) that still points at the original URL will fail to publish. - Account access and 2FA: your npm account must be able to manage the package, and 2FA (two-factor authentication: a code you enter in addition to your password) must be enabled. Step 4 switches the package to require 2FA for publishing, and approving a staged publish also requires 2FA.
- A package that already exists on npm: setup lives on an existing package’s Settings page. The official docs do not describe a separate flow for a brand-new package.
What you get: a project on recent enough versions, with a repository.url that matches GitHub, ready for the form.
Step 1: Add a Trusted Publisher on npmjs.com
This step tells npm which repository and which workflow to trust.
On npmjs.com, open your package, go to Settings, find the Trusted Publisher section, and under Select your publisher choose GitHub Actions. The docs give the management path as Packages → your package → Settings → Trusted publishing.
First, know the two interfaces. npm’s docs describe two versions of the setup, and you can switch between them at the top of the docs page:
- Multiple trusted publishers: each package can have up to 10 trusted publishers.
- Single trusted publisher: each package can have only one at a time.
The two differ in defaults, deadlines, and whether you can edit a configuration, so the rules below are split by interface. Compare the docs with what you see on npmjs.com, and follow the matching version.
The fields are:
- Organization or user (required): your GitHub username or organization name.
- Repository (required): the repository name. For example, for a repo named
my-libunderocto-org, enterocto-organdmy-lib. - Workflow filename (required): the filename only, such as
publish.yml, not the full path. Include the.ymlor.yamlextension; the file must live in.github/workflows/. If publishing is split across two workflows, enter the caller’s filename; see “Special Case: Publishing Split Across Two Workflows” below. - Environment name (optional): a GitHub environment is a deployment gate that can carry protection rules, such as a required human approval. Fill this in only if you use one; otherwise leave it blank.
- Allowed actions: which actions this publisher may perform.
Do not skip Allowed actions. It has two options: npm publish publishes directly and makes the version public right away; npm stage publish sends the version to a staging area, where a maintainer must approve it with 2FA before it goes public.
- Multiple interface:
npm stage publishis always allowed, andnpm publishmust be selected separately. According to the docs, configurations created after 2026-09-03 allow onlynpm stage publishby default. - Single interface: this field is required, and you must select at least one option.
On either interface, if you want the npm publish command in the Step 2 example to succeed, you must select npm publish. Allowing only npm stage publish is a stricter setup, covered in “Stricter Options.”
Before you save:
- Every field is case-sensitive and must match exactly.
- npm does not verify the configuration when you save it. A mistake shows no error now; it fails only when you try to publish.
- On the Multiple interface, an existing configuration cannot be edited; if something is wrong, delete it and create a new one. On the Single interface, you can modify or remove it at any time.
- On the Multiple interface, a new configuration must complete its first successful publish within 2 days. Otherwise it expires and can no longer be used or edited; you have to delete it and start over. So it helps to read Step 2 and get the workflow ready before you come back and save this form.
What you get: a trusted publisher record on npm, waiting for the workflow to match it.
Step 2: Write the GitHub Actions Workflow
In your repo, create .github/workflows/publish.yml and paste in the official npm example below. The filename must match what you entered on npmjs.com:
1
2
3
4
5
6
7
8
9
10
11
12
13
14
15
16
17
18
19
20
21
22
23
24
25
26
27
name: Publish Package

on:
  push:
    tags:
      - 'v*'

permissions:
  id-token: write  # Required for OIDC
  contents: read

jobs:
  publish:
    runs-on: ubuntu-latest
    steps:
      - uses: actions/checkout@v6

      - uses: actions/setup-node@v6
        with:
          node-version: '24'
          registry-url: 'https://registry.npmjs.org'
          package-manager-cache: false  # never use caching in release builds

      - run: npm ci
      - run: npm run build --if-present
      - run: npm test
      - run: npm publish  # Or: npm stage publish
Line by line:
on: push: tags: v*publishes only when you push a tag such asv1.2.3. A tag is a name attached to a specific commit (a saved change), often used to mark a version; ordinary commits do not trigger a publish.permissions: id-token: writeis the critical line. It lets GitHub issue an OIDC identity document for this job. GitHub’s docs say it only allows fetching an OIDC token; it does not grant write access to other resources.contents: readlets the job read the repository. An example in GitHub’s docs notes thatactions/checkoutneeds it to check out your code.runs-on: ubuntu-latestuses a GitHub-hosted runner.- In
setup-node,registry-urlpoints at the official npm registry, andpackage-manager-cache: falsefollows the official comment: never use caching in release builds. - The job then installs dependencies (
npm ci), builds, tests, and runsnpm publish. If you allowed only stage publish in Allowed actions, change that last line tonpm stage publish, as the comment suggests.
The publish step does not need NODE_AUTH_TOKEN, and it does not need --provenance. When you publish with trusted publishing from a public repository to a public package, npm generates provenance automatically. If actions/checkout or actions/setup-node has a newer major version, follow that action’s README; this example uses @v6, as in the official npm docs.
If the package has private dependencies, add this to the npm ci step:
1
2
3
- run: npm ci
  env:
    NODE_AUTH_TOKEN: ${{ secrets.NPM_READ_TOKEN }}
NPM_READ_TOKEN must be a read-only granular token: it is for installing only, never for publishing. To create one, on npmjs.com open your avatar menu → Access Tokens → Generate New Token, and set Permissions to Read-only. (Granular tokens cannot be created from the CLI today.) Then save it in the repo’s secrets under the same name as the example, NPM_READ_TOKEN.
Publishing a scoped package publicly for the first time: a scoped package has a name that starts with @, like @org/package. npm’s guide Creating and publishing scoped public packages says scoped packages are published with private visibility by default, and you make one public with npm publish --access public. The provenance docs also remind you to set access to public explicitly on a first publish.
What you get: a publish workflow that does not store a publishing token.
Step 3: Run a Publish and Confirm It Worked
Push a tag that matches v* (for example, v1.2.3) to trigger the workflow.
How to tell it worked:
- Check the publish result: the workflow’s
npm publishstep finishes without an error, and the new version appears on npm. npm does not verify the configuration when you save it, so you only know the setup is right after a real publish. - Check provenance: if all three conditions are met — trusted publishing, a public repository, and a public package — the version gets provenance automatically. According to Viewing package provenance, a green check mark appears in the Version field to the right of the README on the npmjs.com package page; click it to see details such as the build environment and source commit. A private repository never generates provenance, so its absence there does not mean the setup failed.
- Do not rely on
npm whoami: the docs say this command is not a check of trusted publishing permissions.
If the publish fails, see “Common Mistakes and Fixes” below. On the Multiple interface, keep the 2-day deadline in mind: once a configuration expires, you have to delete it and create a new one.
Next step: only after that success should you retire old tokens. Do not reverse the order.
Step 4: Retire Your Old Tokens
Setting up trusted publishing does not disable old tokens. npm accepts trusted publishers in addition to existing tokens and manual publishes. Follow the docs’ migration tip, in this order:
- Set up trusted publishing and confirm that a publish works.
- On the package, go to Settings → Publishing access, select Require two-factor authentication and disallow tokens, then click Update Package Settings. After that, granular tokens cannot publish this package at all; trusted publishers use OIDC, so they keep working.
- Revoke tokens you no longer need: on npmjs.com, open your avatar menu → Access Tokens, then click the × next to a token, or select tokens and click Delete Selected Tokens. You can also run
npm token listto find the ID, thennpm token delete <id>. The docs say revocation can take up to an hour to take effect. See Revoking access tokens.
Once revoked, the old publishing NPM_TOKEN in your GitHub secrets is no longer useful, so you can delete it too.
What you get: publishes that go through OIDC, with old long-lived tokens no longer able to ship a new version.
Special Case: Publishing Split Across Two Workflows
Some projects split publishing into two workflows: a caller, and a called workflow that actually runs npm publish. The called file must include workflow_call under on so another workflow can invoke it. This pattern is called a reusable workflow.
Two details are easy to get wrong:
- Both layers need
id-token: write. npm requires it on both the caller and the called workflow. GitHub’s docs also say a called workflow can only downgrade, never elevate, the permissions passed from the caller. If the caller does not grant it, the called workflow cannot get it. - Enter the caller’s filename on npmjs.com. npm validates the caller’s workflow filename, not the file that contains
npm publish. The docs note that publishing viaworkflow_dispatch(a manual trigger from the GitHub web page) can cause a similar mismatch.
For example, with release.yml as the caller and publish.yml as the called workflow:
1
2
3
4
5
6
7
8
9
10
11
12
13
# .github/workflows/release.yml (caller)
name: Release
on:
  release:
    types: [published]
permissions:
  contents: read
jobs:
  call-publish:
    permissions:
      contents: read
      id-token: write
    uses: ./.github/workflows/publish.yml
1
2
3
4
5
6
7
8
9
10
11
12
13
14
15
16
17
18
19
20
# .github/workflows/publish.yml (called)
name: Publish Package
on:
  workflow_call:
permissions:
  contents: read
  id-token: write
jobs:
  publish:
    runs-on: ubuntu-latest
    steps:
      - uses: actions/checkout@v6
      - uses: actions/setup-node@v6
        with:
          node-version: '24'
          registry-url: 'https://registry.npmjs.org'
          package-manager-cache: false
      - run: npm ci
      - run: npm test
      - run: npm publish
On npmjs.com, enter release.yml, not publish.yml.
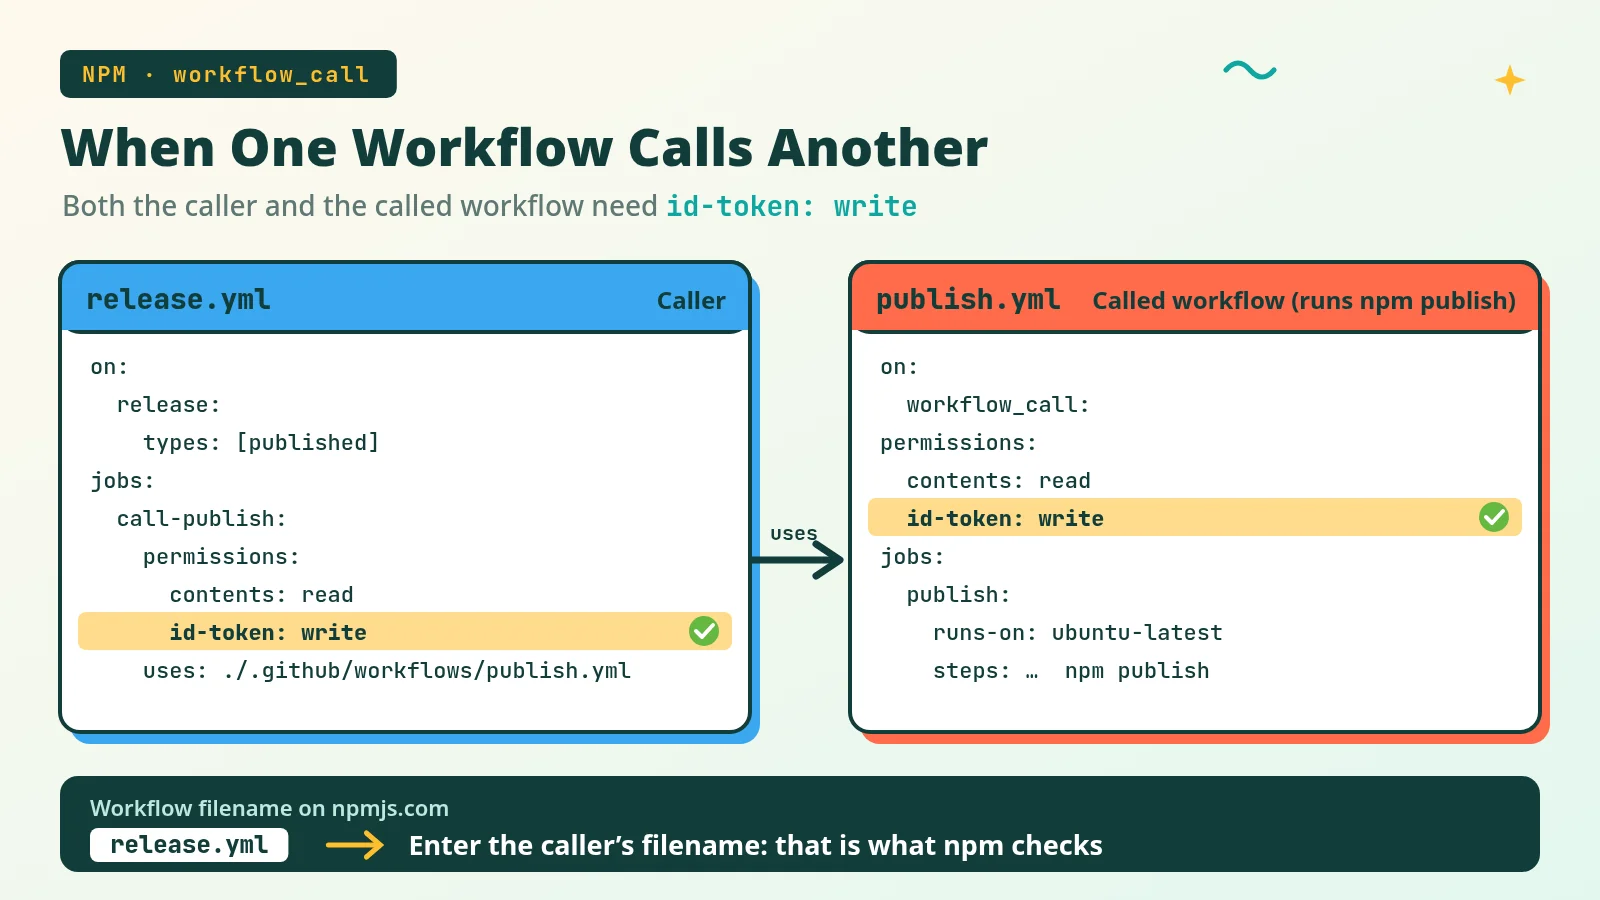 A concept illustration: on the left, the caller
release.yml; on the right, the called publish.yml. Both need id-token: write, and npmjs.com should be given the caller’s filename.
Stricter Options
Trusted publishing removes the long-lived token, but a compromised workflow can still publish. If you want extra gates, the docs suggest these. You do not need all of them:
- Environment approval: give the publish job a GitHub environment that requires a human approval, and enter the same name in Environment name on npmjs.com.
- Tag protection rules: limit who can push the tags that trigger a release.
- Stage publish only: in Allowed actions, permit only
npm stage publish, and change the workflow’s last line tonpm stage publish. Each version then waits in a staging area until a maintainer approves it with 2FA, either with Approve on the package’s Staged Packages tab on npmjs.com or withnpm stage approve <stage-id>. The docs treat a stage-only trusted publisher as a stronger combination. This requires npm CLI 11.15.0 or later; see Staged publishing. - Regular reviews: audit the package’s trusted publishers periodically, and delete publish tokens you no longer use.
Limits You Should Know First
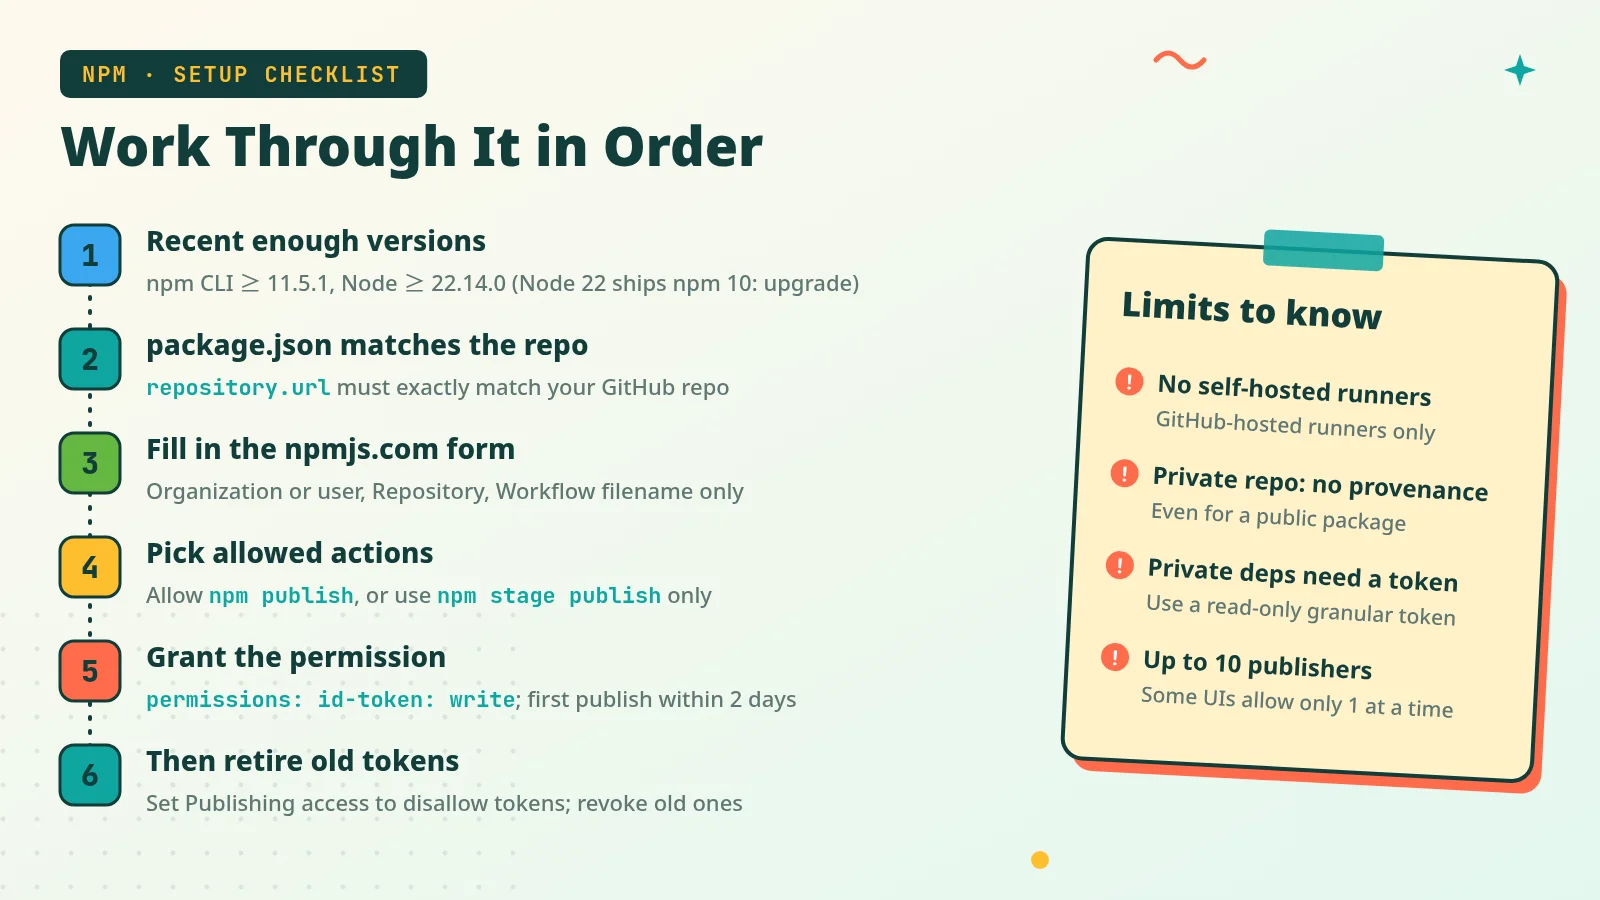 A concept illustration: on the left, Steps 0 through 4 of this post condensed into a six-item checklist; on the right, the four limits people hit most often: no self-hosted runners, no provenance from a private repository, a token still needed for private dependencies, and a publisher count that depends on the interface. The 2-day deadline in the checklist applies only to the Multiple interface; the full list of limits is below.
Read these limits before you rely on the setup:
- Self-hosted runners are not supported today.
- Trusted publishing does not stop workflow injection: if malicious commands have already been injected into the workflow, it can still publish.
- Provenance is generated automatically only when trusted publishing, a public repository, and a public package all apply. The docs say private repositories do not get provenance, even when publishing public packages. CircleCI does not generate provenance today either.
- Provenance tells people where a version was built; it does not guarantee the package has no malicious code.
- Installing private dependencies still requires a read-only token.
- The number of publishers you can configure depends on the interface: up to 10 on the Multiple interface, one at a time on the Single interface.
- On the Multiple interface, an existing configuration cannot be edited; you have to delete it and create a new one.
What to Do in Each Situation
| I want to… | Do this |
|---|---|
| Set it up for the first time | Check versions and repository.url; add a GitHub Actions publisher on npmjs.com and select npm publish; write a workflow with id-token: write; on the Multiple interface, complete the first publish within 2 days |
| Confirm the setup works | Publish once for real; npm does not verify on save, and npm whoami is not a check |
| Hit ENEEDAUTH on publish | Check the workflow filename (including the extension), letter case, a GitHub-hosted runner, and id-token: write |
| Fix a wrong setting | Multiple interface: delete and recreate it; Single interface: edit it directly |
| Recover an expired setting | Delete and recreate it, then complete a publish within 2 days |
| Stay on Node 22 | Upgrade npm to 11.5.1 or later before publishing, or switch to Node 24 |
| Install private dependencies | Add a read-only NODE_AUTH_TOKEN to npm ci |
| Split the workflow into two files | Give id-token: write to both layers; enter the caller’s filename on npmjs.com |
| Use a self-hosted runner | Not supported yet, so trusted publishing is not an option for now |
| Require a person to approve each version | Add an environment approval, or allow only npm stage publish |
| Still have old tokens after setup | Confirm a successful publish, change Publishing access, then revoke the tokens |
Common Mistakes and Fixes
Where people most often get stuck, and what to do:
ENEEDAUTHor “Unable to authenticate”: check the workflow filename on npmjs.com (including.ymlor.yaml) and the letter case of every field. Confirm you are on a GitHub-hosted runner and that the workflow hasid-token: write.repository.urldoes not match: therepository.urlinpackage.jsonmust exactly match the GitHub repository. Check this carefully on forks.- Allowed actions does not include
npm publish: configurations created on the Multiple interface after 2026-09-03 allow only stage publish by default. Existing configurations there cannot be edited, so delete it, create a new one withnpm publishselected, and publish within 2 days. - The configuration expired: on the Multiple interface, a new configuration expires if it has no successful publish within 2 days. Delete it, create a new one, and publish within 2 days.
- Using
workflow_callwith the called workflow’s filename: enter the caller’s filename instead, and make sure both layers haveid-token: write. - Staying on Node 22 without upgrading npm: Node 22 bundles npm 10.x, which is below 11.5.1. Upgrade npm before publishing, or switch to Node 24.
- Private dependencies fail to install:
npm cineeds a read-only token; trusted publishing does not handle installs. - Treating missing provenance as a failure: private repositories never get provenance.
- Using
npm whoamias a check: the docs say this command is not a check of trusted publishing permissions. - Assuming old tokens stop working once trusted publishing is set up: you still need to change Publishing access and revoke unused tokens.
What to Do Next
Once GitHub Actions publishes with a short-lived credential instead of a long-lived key, retire the old tokens, and add an approval or stage publish if you want a tighter gate. For defenses on the user side, see Third-Party Skills and MCP Servers: The New Attack Surface in Your Coding Agent. To add automated review to these workflows, see Automating PR Review With GitHub Actions and an AI Agent: This Site as an Example.
Treat Trusted publishing as the official reference, along with provenance, about access tokens, staged publishing, and GitHub’s OIDC documentation. For another security write-up on this site, see OpenSSH Password Authentication Bypass: Which Hosts Are Affected, and How Alpine Users Can Patch.